Terminal Escape Room’s Standard Mode brings out some of the most complex challenges, taking it a step above Beginner. Four chapters are currently available to play, each with its own puzzles and keypad combinations. We’re here to help guide you by showing you all Roblox Terminal Escape Room Standard Mode answers for Chapters 1 to 4.
All Chapter 1 Standard Mode answers in Roblox Terminal Escape Room
Every Terminal Escape Room Chapter features a specific time limit to increase the challenge. While the first phase begins with a 45-minute duration, the later Chapters extend it to 90 minutes. We’ll break down each one to complete all puzzles in Roblox’s Terminal Escape Room.
Cabin 1
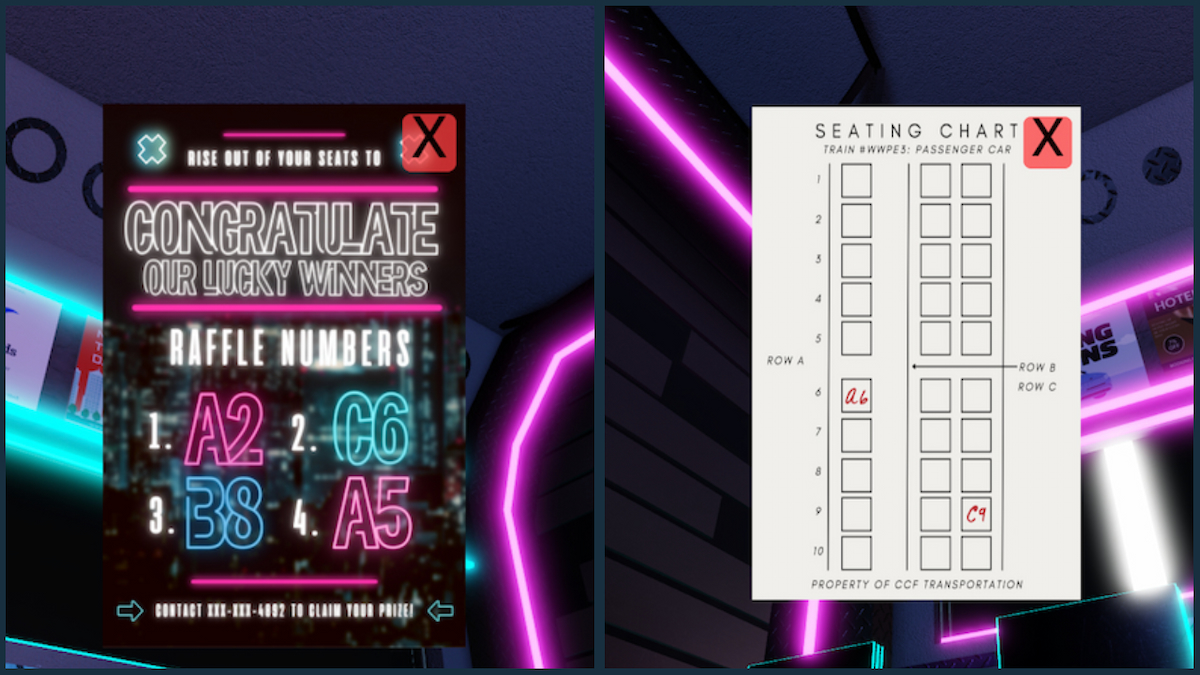
You’ll start your escape room adventure on a train filled with mystery. At the first cabin, look at the posters to get information about the door’s keypad password. Using the raffle numbers and seating charts (flip the seats), we can determine that 3479 is the correct combination for the locked doorway.
Cabin 2
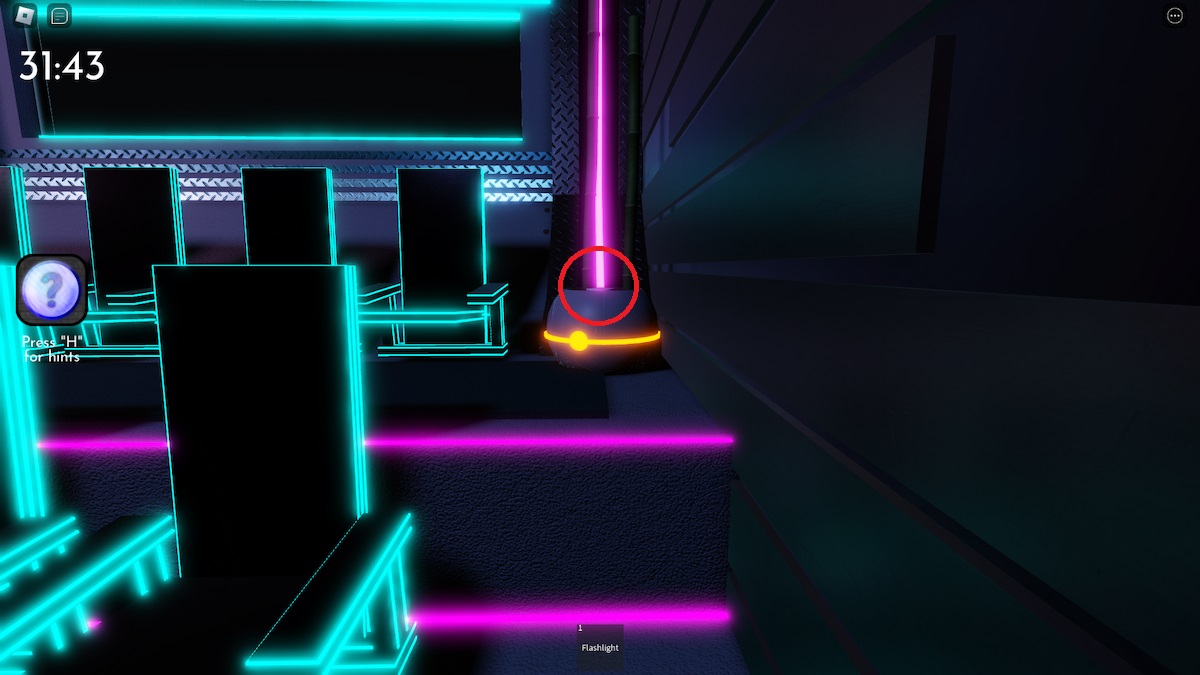
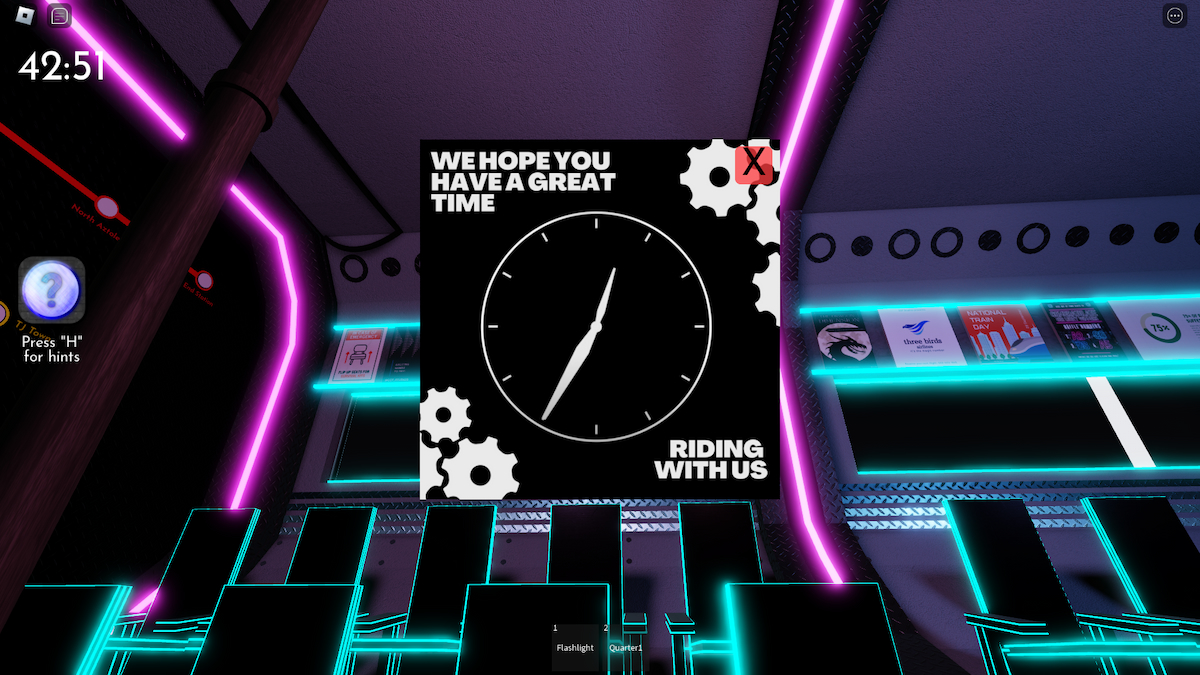
The next cabin unlocks after you interact with the vending machine. However, you’ll need some cash to access it. Return to the first cabin and grab a coin near the potted plant toward the back. Now, you’ll need to get another quarter, which can picked up from the ATM. The passcode will be on a piece of paper with a clock in the first cabin. It’ll come out to the ATM combination of 1235.
Grab the quarter from the ATM and go to the vending machine. Select the item ‘2C’ and collect the keycard, allowing you to leave the cabin.
Cabin 3
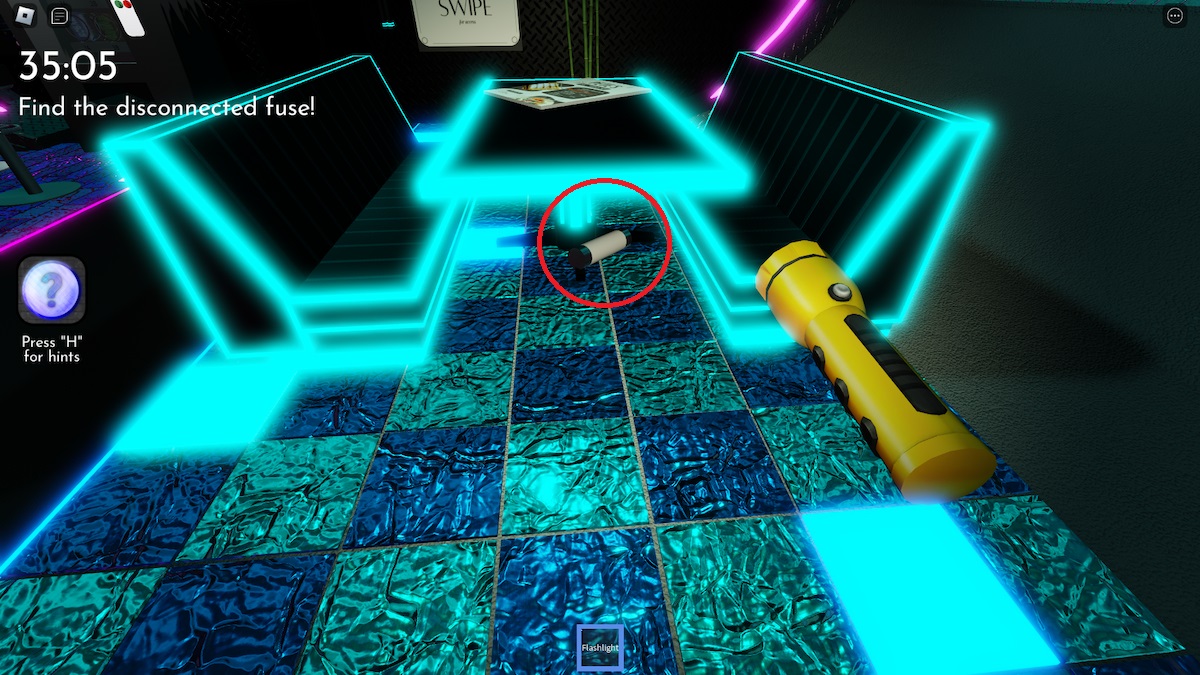
Once you’ve reached Cabin 3, interact with the keypad by the locked door. Although the fuse will blow, this is what you want to happen to trigger the following task. Locate the disconnected fuse in Cabin 1 or 2 and place it back in the box. The location may vary, but you can try to look near the tables or the vending machine in Cabin 2.
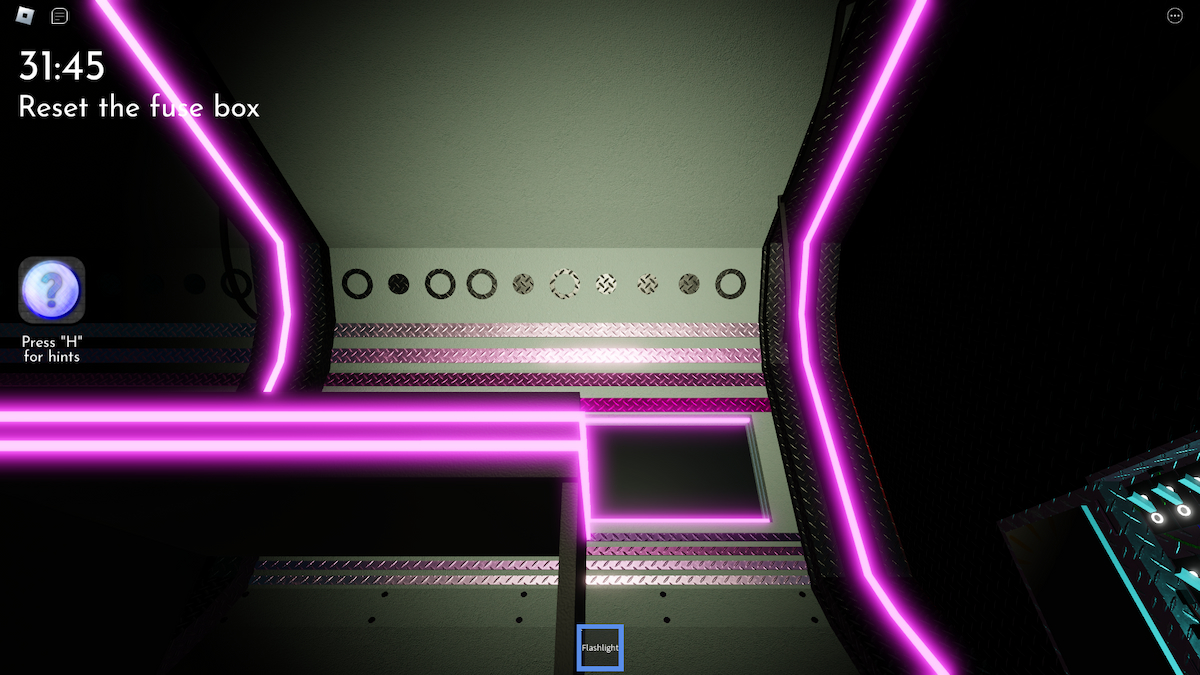
To turn on the electricity, you must set the fusebox to the correct pattern. A hint for this is just above the box on the upper left side.
For the correct pattern, here’s the proper layout for the fusebox reset in Roblox’s Terminal Escape Room:
- Up
- Down
- Up
- Up
- Down
- Up
- Down
- Down
- Down
- Up
By the end of it, the fusebox should look like this:
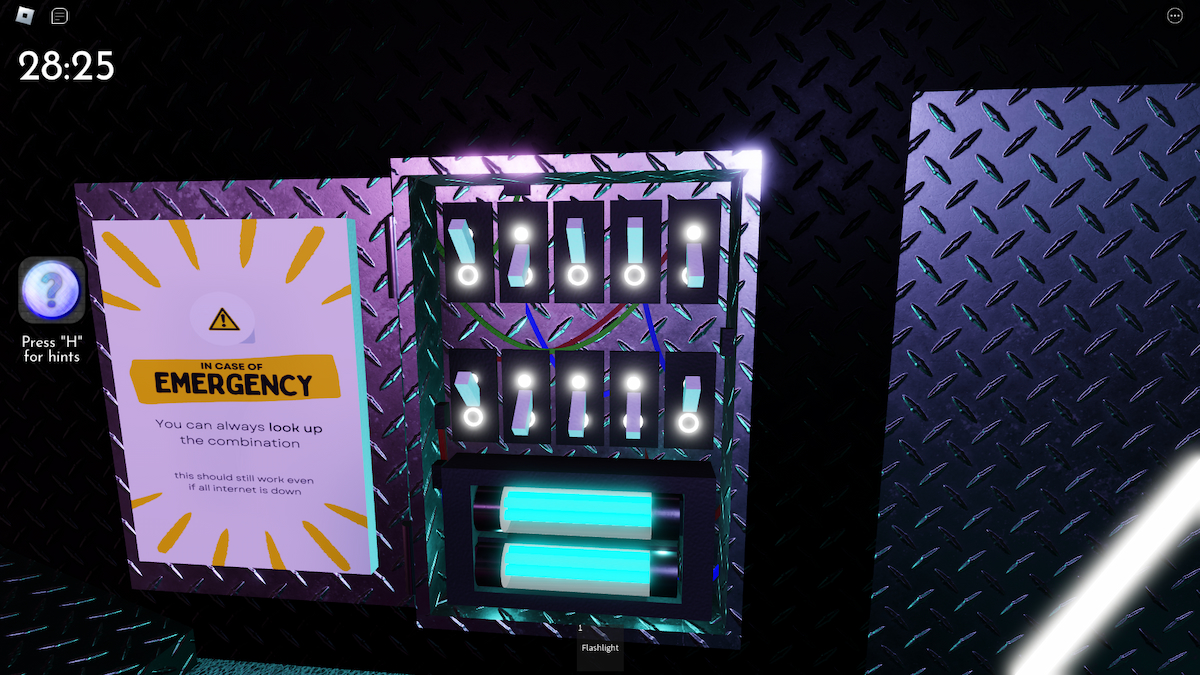
You’ll need to figure out the keypad code for the main door. Use the Morse Code paper above to determine the answer with the blinking red light from Cabin 1. The combination will be 3967.
Cabin 4

We’ve finally reached the last cabin of Terminal Escape Room’s Chapter 1. It requires a four-digit code that can be deciphered with the hints above the door. If you want to skip past these puzzle solves, the code for the door will be 7941.
Those who want to understand how we got here can read on. First, return to Cabin 1 once again to acquire the Hotel Sevens paper. This item gives us our first number for the keypad. For the next clue, solve an equation involving the number of plants with colored rings.
Based on the hint, you’ll need to add up the amount of bamboo with the green and purple rings. Then, subtract it from the one with the yellow design. The equation for this will be ‘(6+5)-2=9’. Thus, ‘9’ will be the second digit.
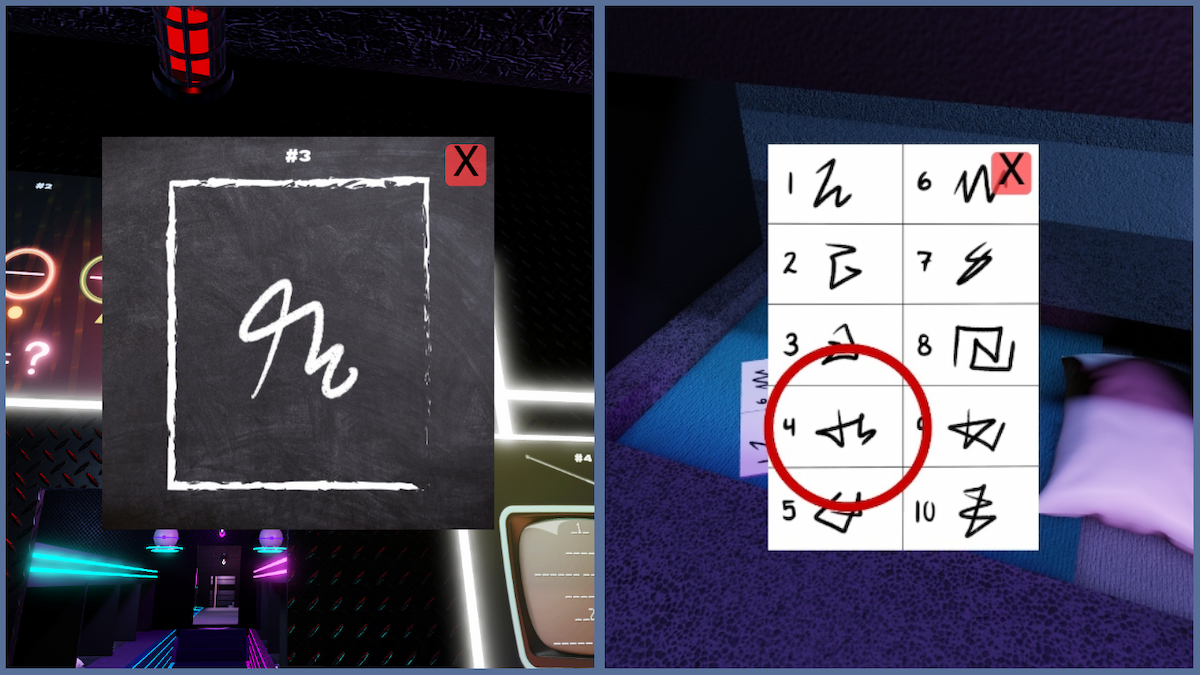
The third digit correlates with a specific symbol in Cabin 3. This answer leaves us with the number four, as it is the only one that matches the artwork in Cabin 4.
Look at the monitors in Cabin 4 to determine the last digit. If you link it up to the provided hint, the end result will be ‘SOS,’ ‘DANGER,’ and ‘BRAKES DISABLED.’ Spelling this out gives us the number one for the last hint. Now, you can input it into the keypad and leave the train.
All Chapter 2 Standard Mode answers in Roblox Terminal Escape Room
Terminal Escape Room’s Chapter 2 takes it up a notch with even more challenges and a 90-minute time limit. Let’s dive into these puzzles and answers.
Puzzle 1
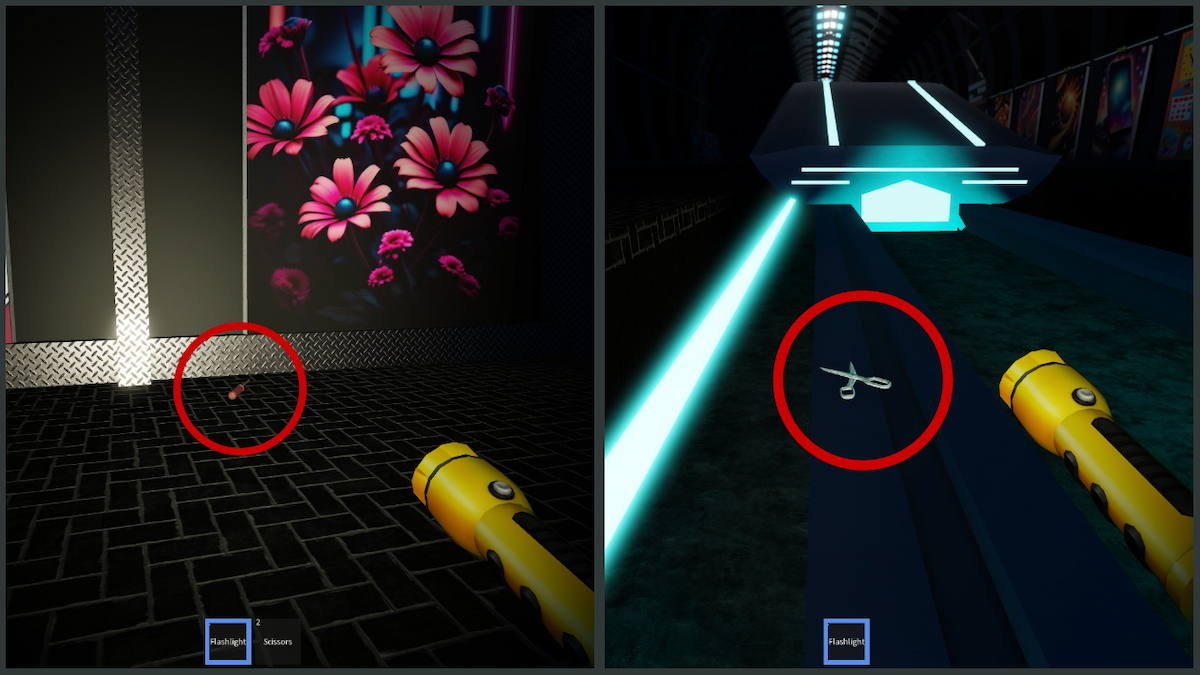
In the first room, you’ll need to pick up a pair of scissors and a screwdriver. The scissors are on the tracks in front of the train, while the screwdriver is near the painting with flowers.
Use the screwdriver to open the metal panel on the train directly across the main keypad. Cut all the wires inside it in any order you please. However, you must reconnect them in a specific way to get the correct result. A hint will be provided at the back of the train, linking to the Standardized Electrical Rewiring Protocol paper. Based on this, connect the wires in this order:
- Purple
- Brown
- Red
- Green
- Black
- Orange
- White
- Pink
- Yellow
- Blue
You must then obtain a keypad code to unlock the main door. Parts of the combination will be on the posters on the wall, showcasing the numbers two and three. The illuminated sign above the keypad also provides the answer, ’19’, if you look at the flashing letters. Together, that makes the Chapter 2 door answer 2193.
Puzzle 2

The next puzzle will be tricky since it involves a ton of steps. But, if you want to save yourself a lot of time, input the answer 2567 on the keypad next to the hatch. For a quick explanation of how we got here, here’s what each hint on the computer means:
- Take out trash: Use the sticky notes near the broken glass to produce an equation:
- 4 (Moon) x 4 = 16
- 7 (Sun) x 2 = 14
- 16 – 14 = 2
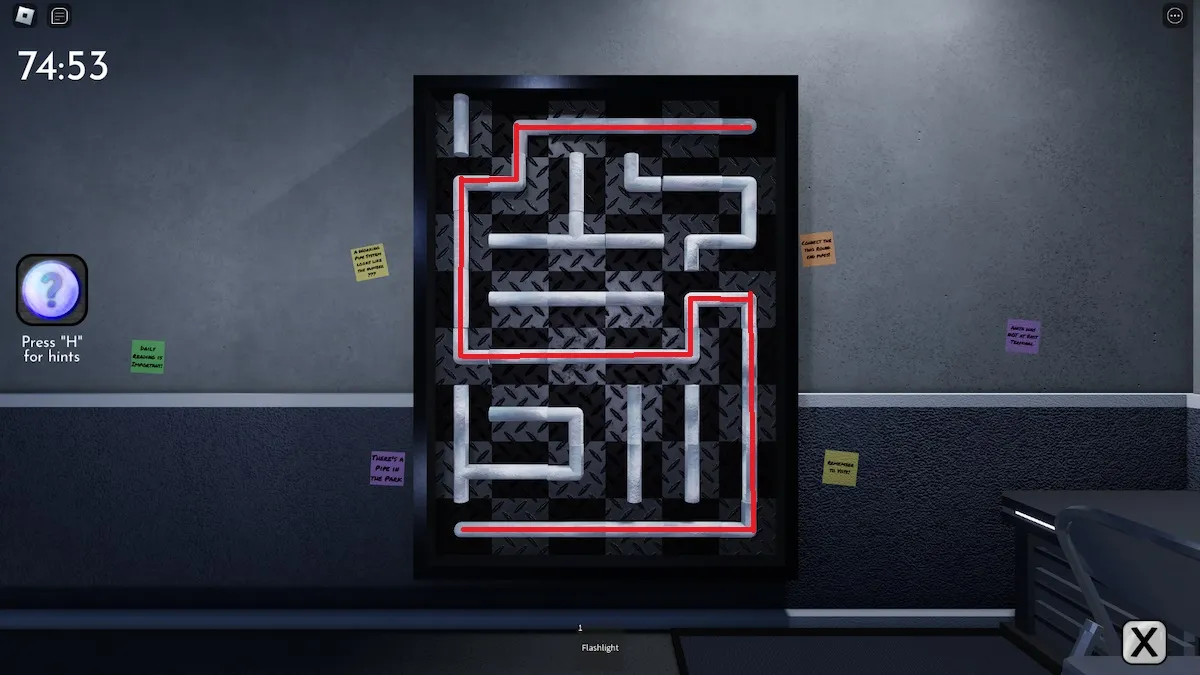
- Find two pipes and fix plumbing: The first pipe will be on top of the train, and the second will be taped to the tree painting in the first location. Place the two pipes on the wall puzzle for the next digit.
- Track Anita’s location yesterday: Follow Anita’s whereabouts with hints from the sticky notes
- Count sticky notes: Count all the sticky notes in the room (84) and divide by 12
The pipe layout will be slightly confusing, as some items don’t need to be rotated. All that matters is that the number ‘5’ is shown:
Puzzle 3
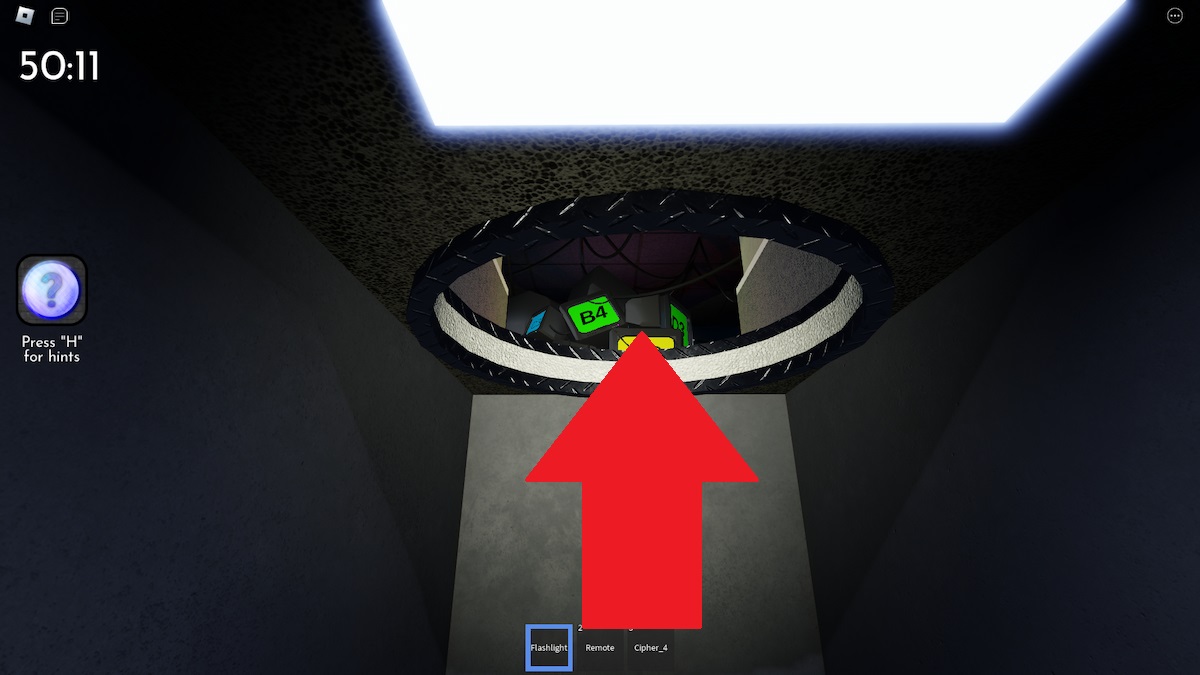
After you’ve opened the hatch, enter a maze and find the room with the stack of TVs. Enter the code 2678. If you want to decipher this puzzle for yourself, pick up the remote in the labyrinth first. Next, pause the TV in the third room. Match the combinations from the stacked TVs to the grid to get the correct combination.
Puzzle 4
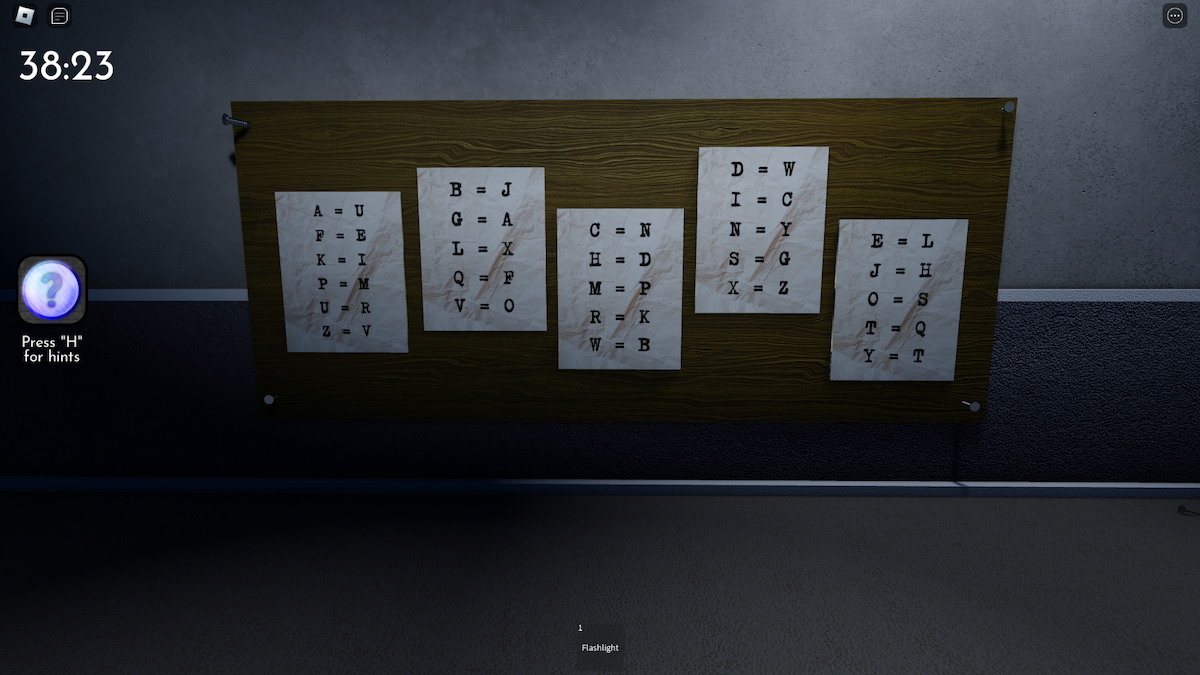
The fourth puzzle utilizes ciphers from the previous rooms. Use the code 3482 on the keypad for a quick solution, concluding the last puzzle of Terminal Escape Room Chapter 2. If you want to find the ciphers, go to these areas on the map:
- Two in the maze
- Next to the air conditioner in the second room
- Near the dragon artwork in the train room
- Inside the area with TVs
You’ll then be able to place them all in the final room to start another puzzle-solving adventure. Look at the writings on the wall and the paper with ‘To Check’ to develop a mathematical equation. Replace the letters with the ciphers to get the final answer of 23 TVs, 30 Pipes, and seven Beginner Guides. That leaves us with the equation, ’45 + (23 x 5) + (30 x 100) + (7 x 46) = 3482.’
You’re free to leave the area after this, going on to the next Terminal Escape Room Standard Mode puzzle.
All Chapter 3 Standard Mode answers in Roblox Terminal Escape Room
The elevator from Chapter 2 takes you over to the next phase of Terminal Escape Room. As you might expect, the puzzles here are much more complex than last.
Elevator puzzle
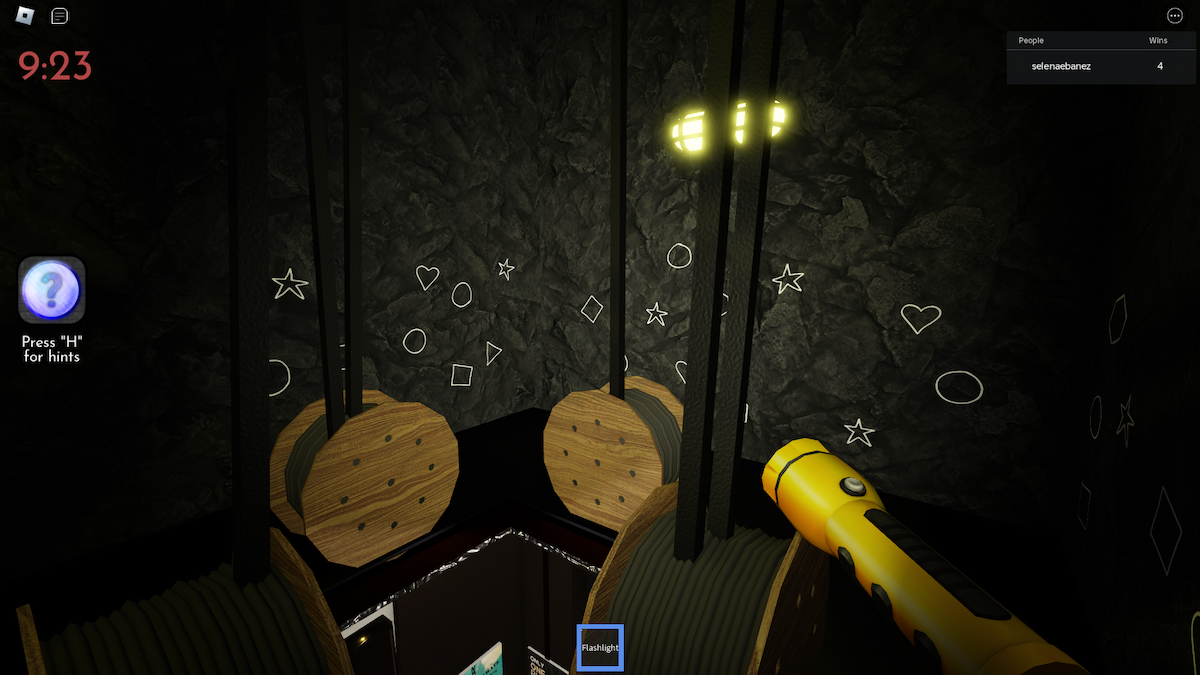
Unfortunately, the first room doesn’t have a universal passcode that all players can use, as it is randomized. Therefore, you must decipher the puzzles to develop your own unique combination. Don’t worry; we’re here to help guide you through it. First, open the hatch above the elevator and go up the ladder. Count the number of triangles for the first digit.
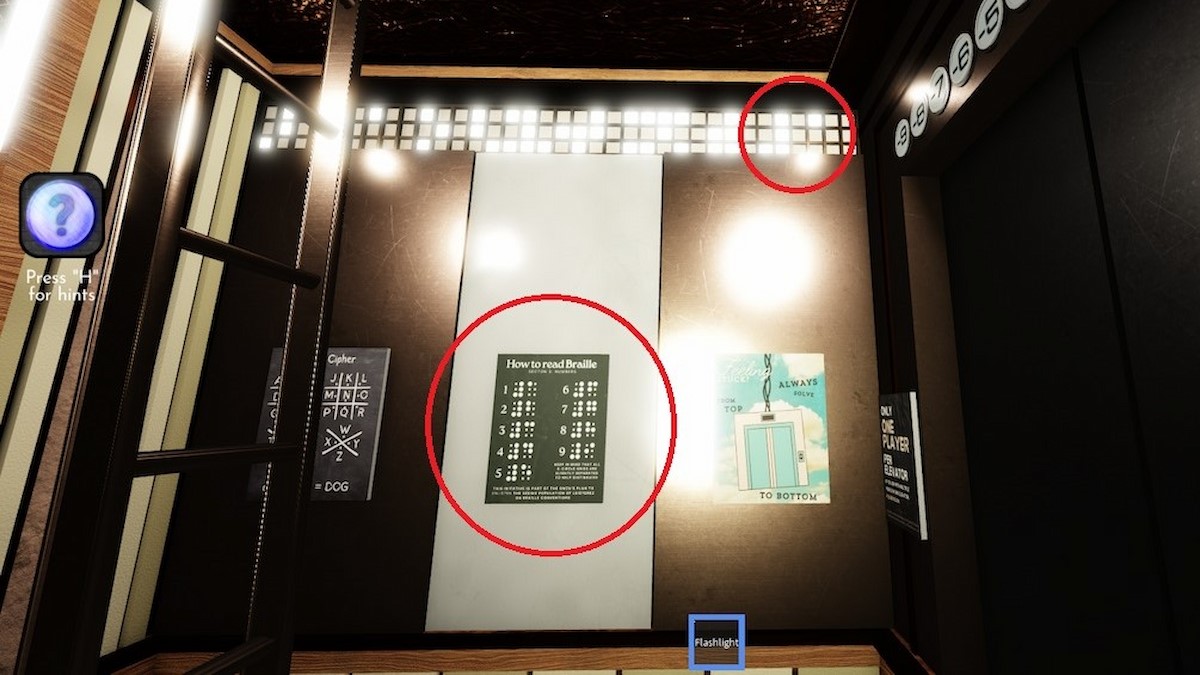
Then, go back down to locate the ‘How to read Braille’ poster. Look above, and you’ll see a series of numbers in braille. Pay attention to the last two symbols to decipher the second digit.
Locate the next hint on the Iguana identification paper. You’ll see a line of blocks in a particular order, linking to a number for the elevator combination. Match it with the blocks at the bottom of it for the right code. Some blocks will be darker than others, which correlates with the artwork on the paper.
For example, mine came out to be the number six, given that they have the same pattern.

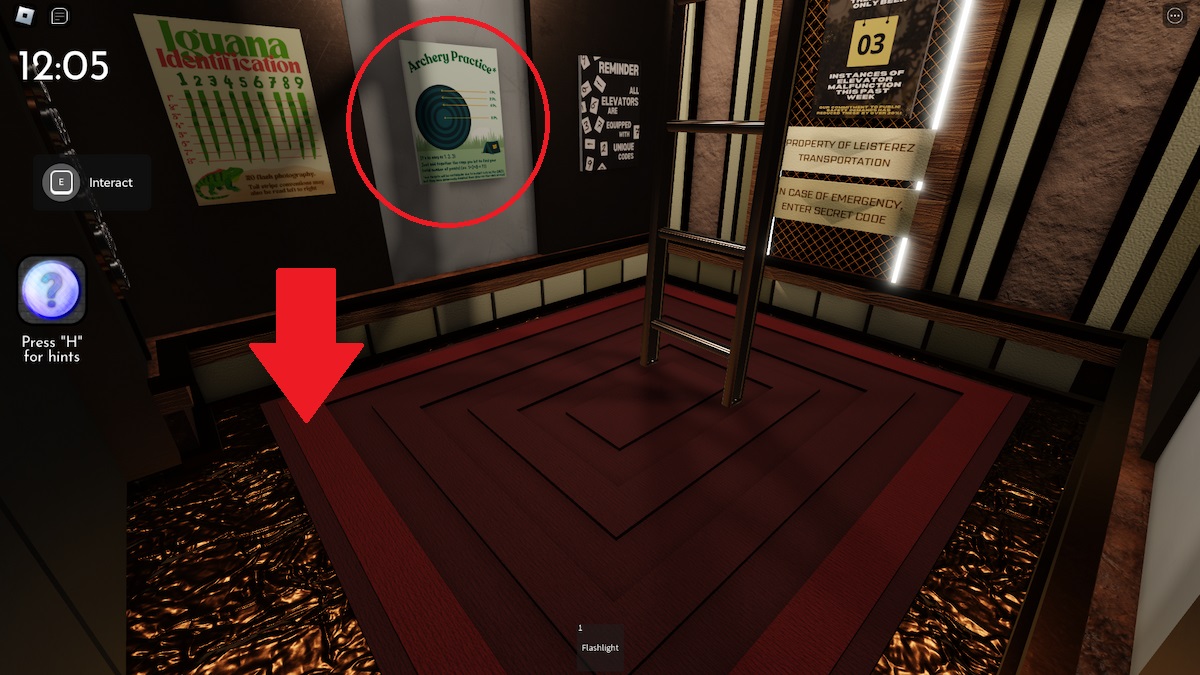
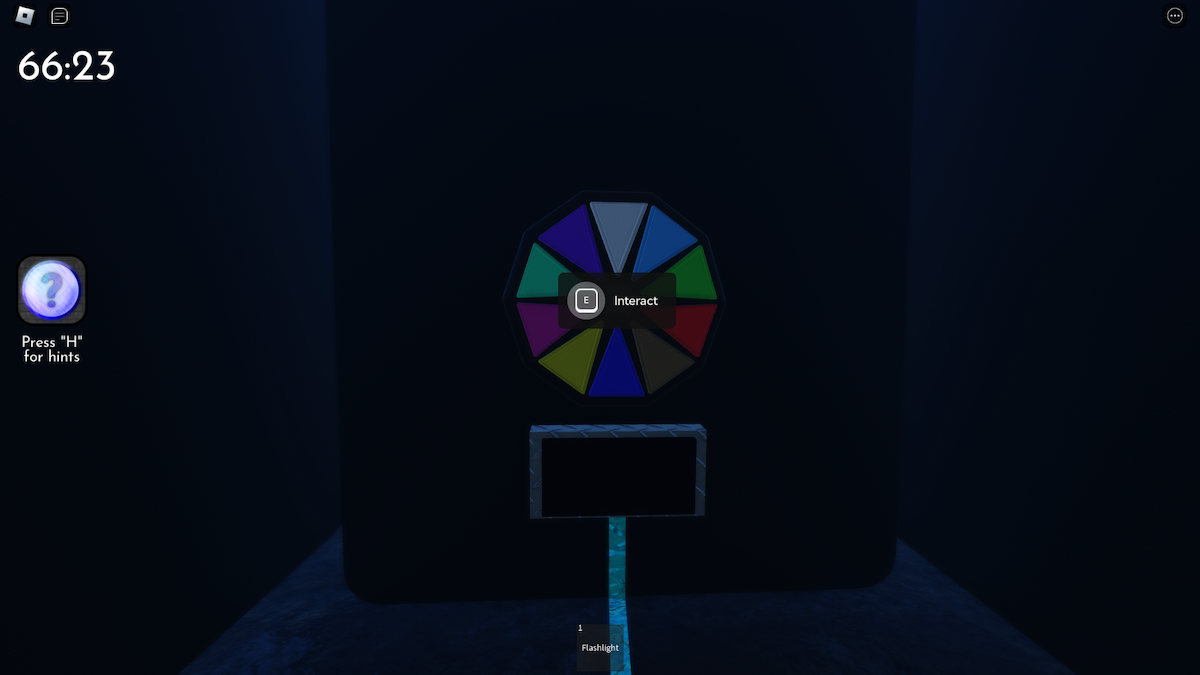
Use the dartboard poster to discover the final number for the Terminal Escape Room elevator combination. The bright red ring on the elevator’s floor matches the points shown on the dartboard paper. The red ring was in the outermost layer of my puzzle, meaning it would translate to one. Combine all four numbers and input them to exit the elevator.
Corridor puzzle
The following location is divided into various rooms that require a keypad combination. We’ll provide you with the answers to get you the keys to the Nursery room.
You’ll need to pick up pieces of paper, boxes, and paint cans around the area to get enough hints for the puzzle solution. Using these will give you the following combinations for each room:
- Box room: 6824
- Paint room: 5431
- Newspaper room: 7083
- Arcade room: Chains
After you enter each combination, pick up the items from their respective locations. It’s crucial to grab the keys here to unlock the Nursery room.
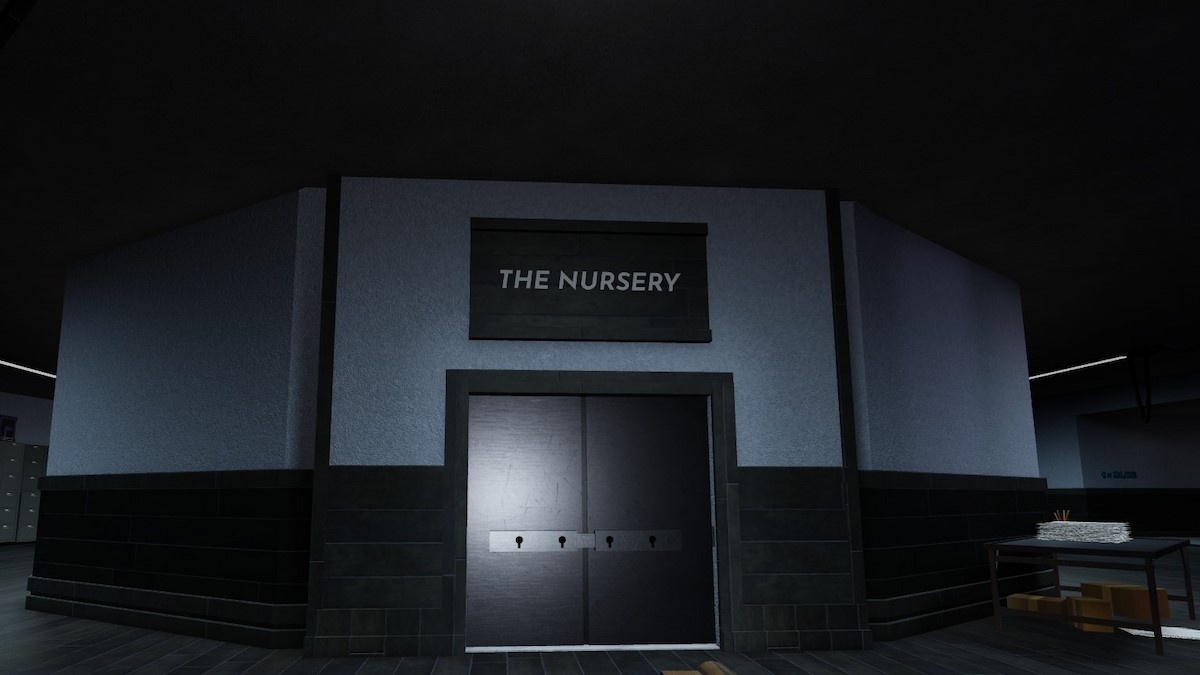
Nursery room
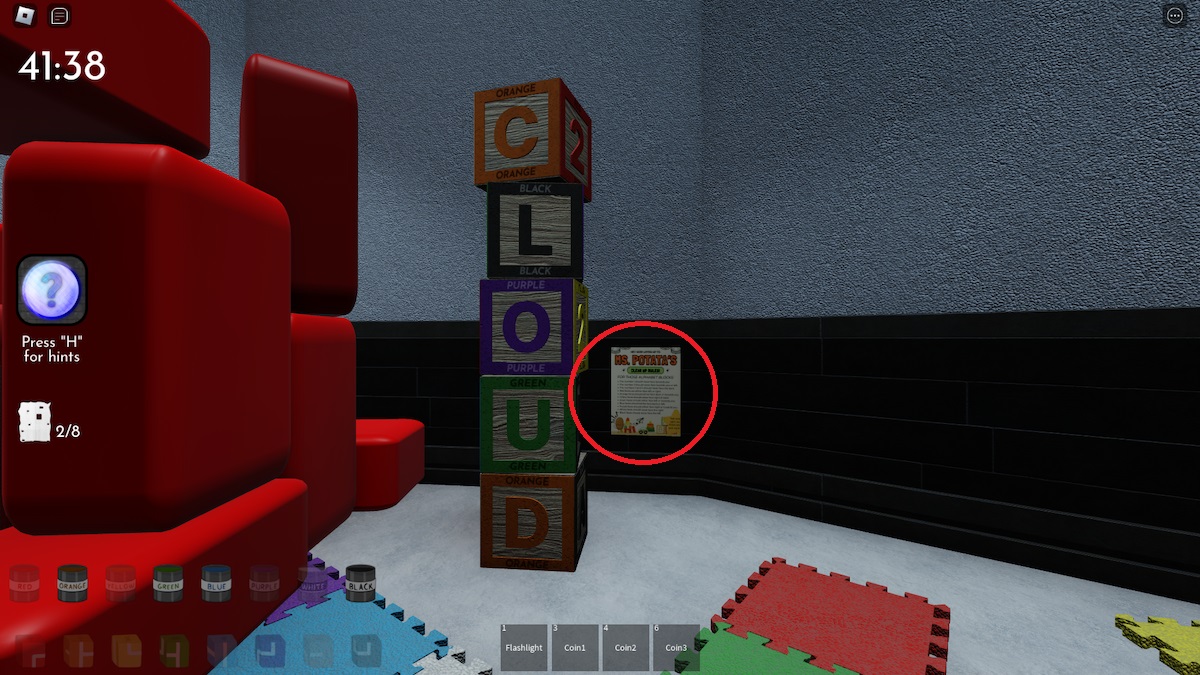
The last Terminal Escape Room Chapter 3 puzzle involves four wooden block stacks. You can solve them using the directions from Ms Potato’s papers. Starting from left to right, arrange the blocks with these words:
- Cloud
- Spac3
- Ocean
- Pl4nt
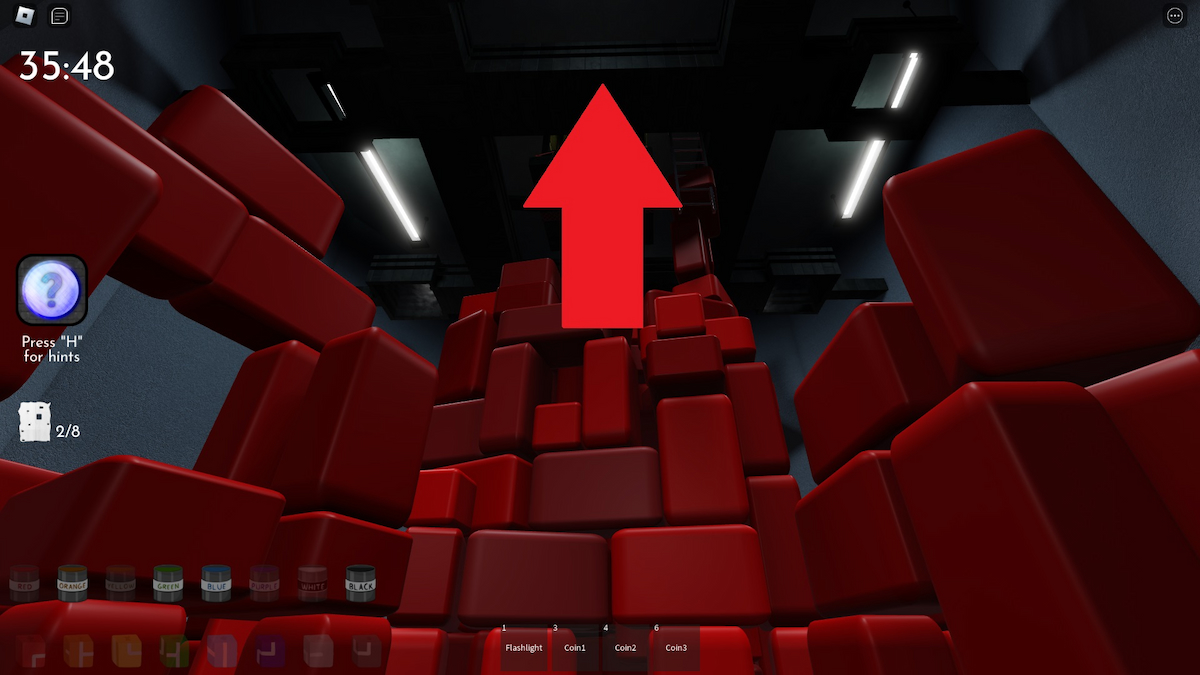
Match these words with the posters around the room to get the combination 0743. Jump up to the top of the area, where you should find a ladder. Enter the code and press the green button to solve the last puzzle for the chapter.
All Chapter 4 Standard Mode answers in Roblox Terminal Escape Room
Terminal Escape Room Chapter 4 Standard Mode is the most challenging feat yet. Solutions will be randomized, so keypad combinations will rarely be the same. Fortunately, it’ll still use the same techniques, and we’re here to cover them all.
Checkers and Reagant Shelf puzzle

Starting with the first puzzle, go to the checkerboard and note down the positions of the black pieces (starting from top to bottom). Match them with the letters on the grid above. For example, I got 2F, 4H, 6F, and 7E.
Go to the Reagant Shelf and link these numbers and letters to the Regeant Clean Up paper. Match it with the ones on the shelves and select the bottle to see its element.
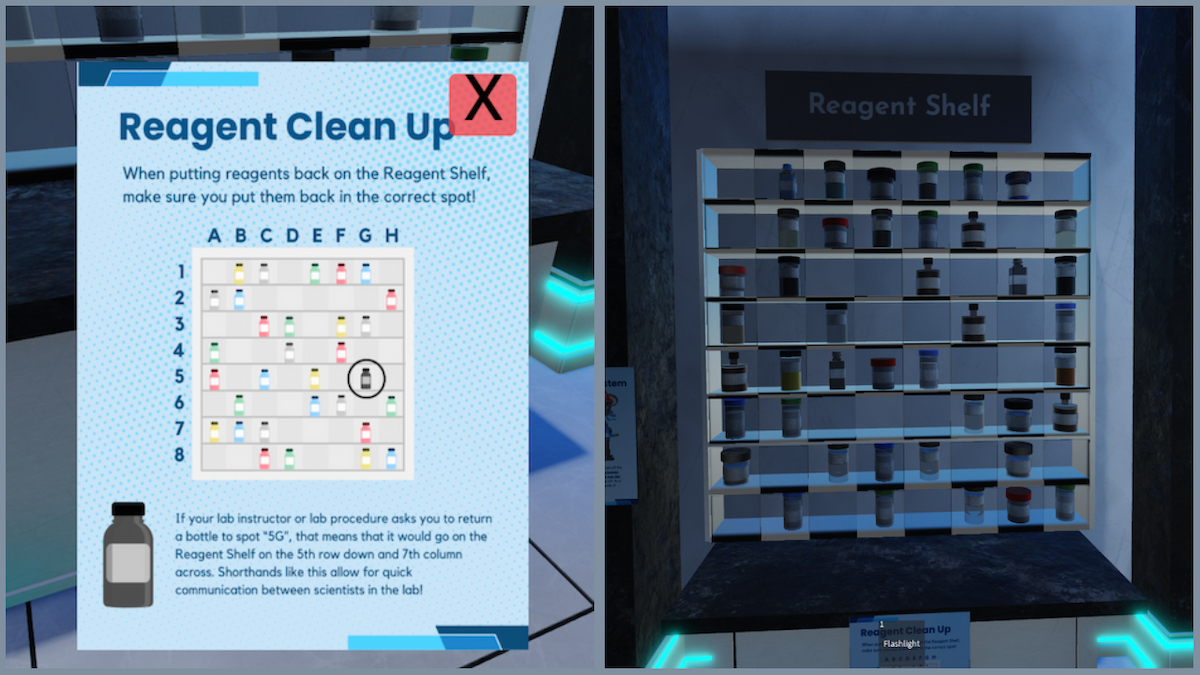
Go to the Periodic Table of Elements to produce the acronym of each element. Based on my own experience, I got the letters ‘Uproar’ when combining them. Enter this word in the keyboard nearby, and pick up the items from the unlocked drawer.
Tic-tac-toe puzzle
Check the Beaker Clean Up poster to determine the order of the tic-tac-toe boards. Here are the locations you need to go to find the boards (make sure it’s in this exact order):
- Cylindrical Beaker: Periodic Table of Elements
- Triangular Flasks: Dollhouse
- Circular Round Bottom Flasks: Below Beaker Clean Up poster
- Test Tubes: Domino table
The goal here is to determine the winning box from the tic-tac-toe boards and then note its block number. The box with a dotted line at the bottom will always be number one, so it would look like this:
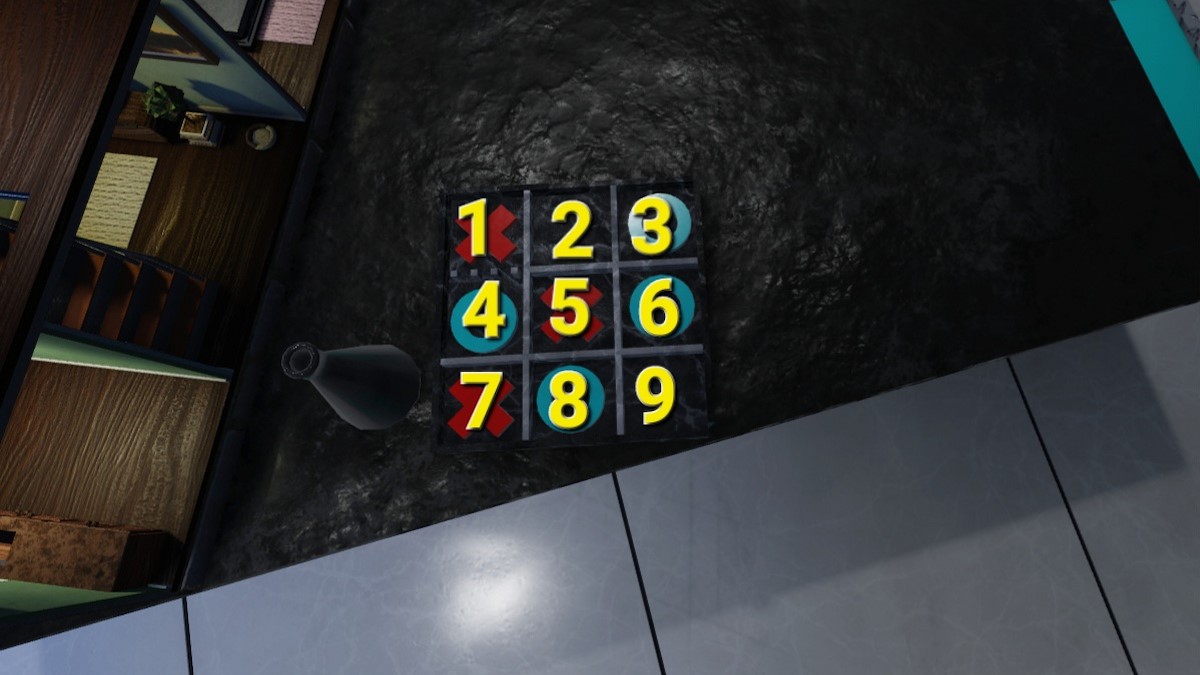
As an example, my winning box would be nine, which I would note down as the first digit. Repeat this step with the remaining boards, using the locations we mentioned earlier.
With all four numbers, walk over to the board on the wall, which will have the same dotted lines as the tic-tac-toes. Unfortunately, it will be rotated to throw you off, but we’ll show you the numbers to help make it easier:
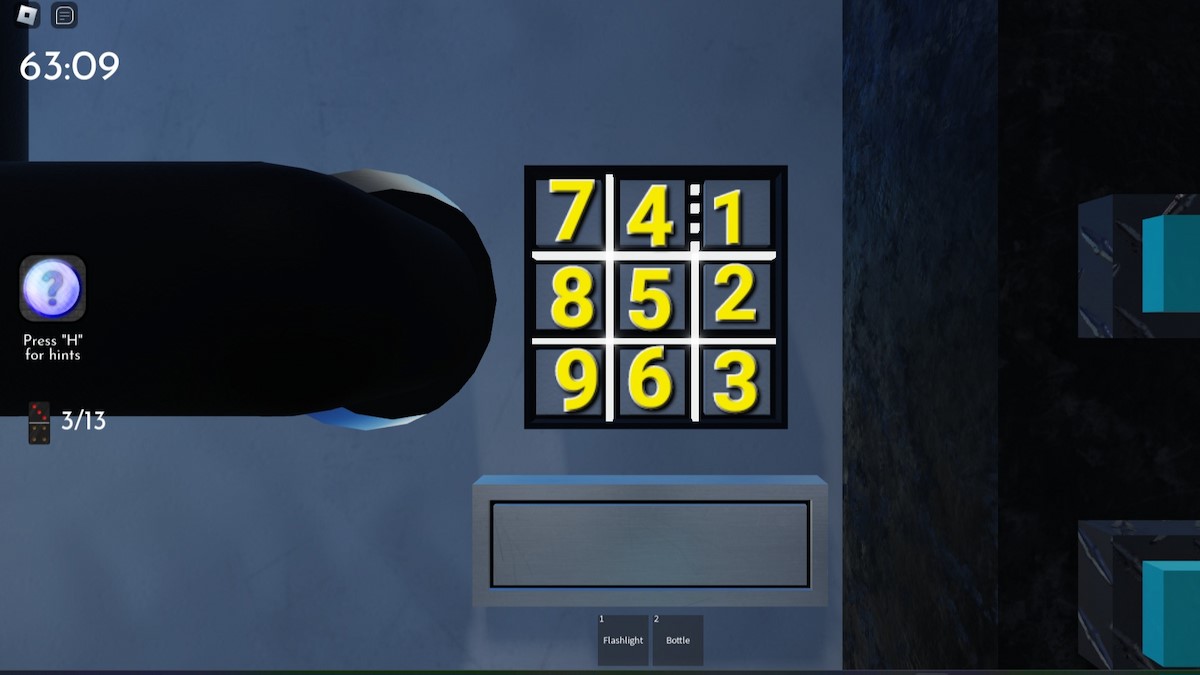
Click on the boxes that match the numbers you’ve gathered and collect another set of items.
Combustible Corrosive Cocktail puzzle
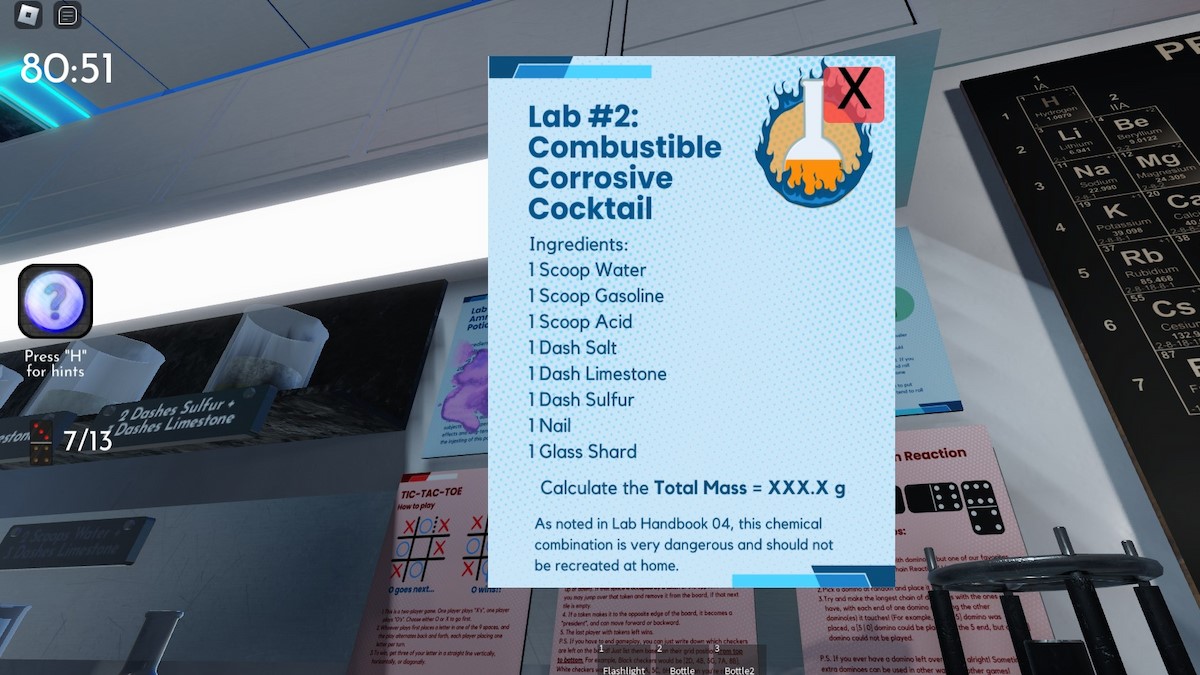
The next puzzle will be associated with the Combustible Corrosive Cocktail paper. The total mass of these ingredients determines the correct combination. We’ve compared this challenge with other playthroughs, and the weights seem to remain the same. Here’s what each one should come out to:
- 1 Scoop Water: 40g
- 1 Scoop Gasoline: 28.4g
- 1 Scoop Acid: 48g
- 1 Dash Salt: 21.6g
- 1 Dash Limestone: 23g
- 1 Dash Sulfur: 19g
- 1 Nail: 7.5
- 1 Glass Shard: 8.5g
Add these together to get a mass of ‘196.0’, which translates to 1960 for the keypad combination. If this answer doesn’t work for you, you must weigh each beaker yourself to determine its grams.
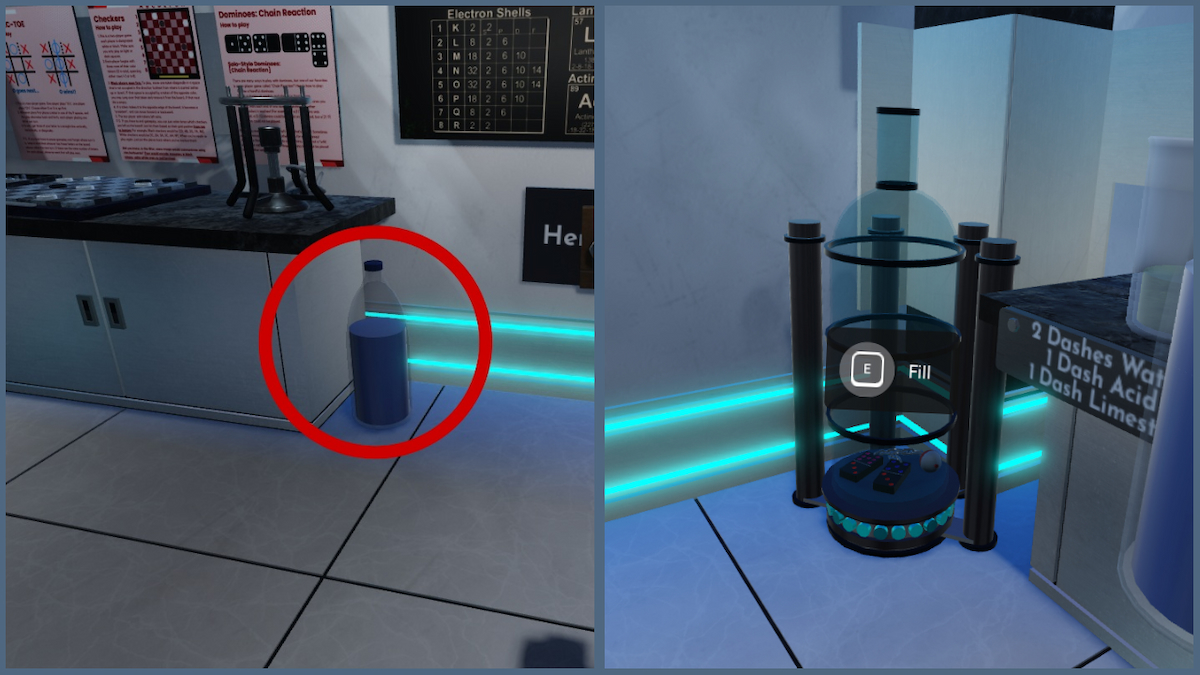
After this puzzle is over, grab a bottle next to the posters and use the remaining ones to fill the glass container.
You’ll now have all the dominos for one of the last puzzles in the lab room. To win, match up the dominos in the correct order. For instance, if a piece has seven dots, you place down a domino with the same exact number next to it. Do the same with the rest of them to get the last piece.
Use the final domino to open the fume hood door and press the button inside. It will be near the Shrink and Grow Platforms paper.
Dollhouse puzzle
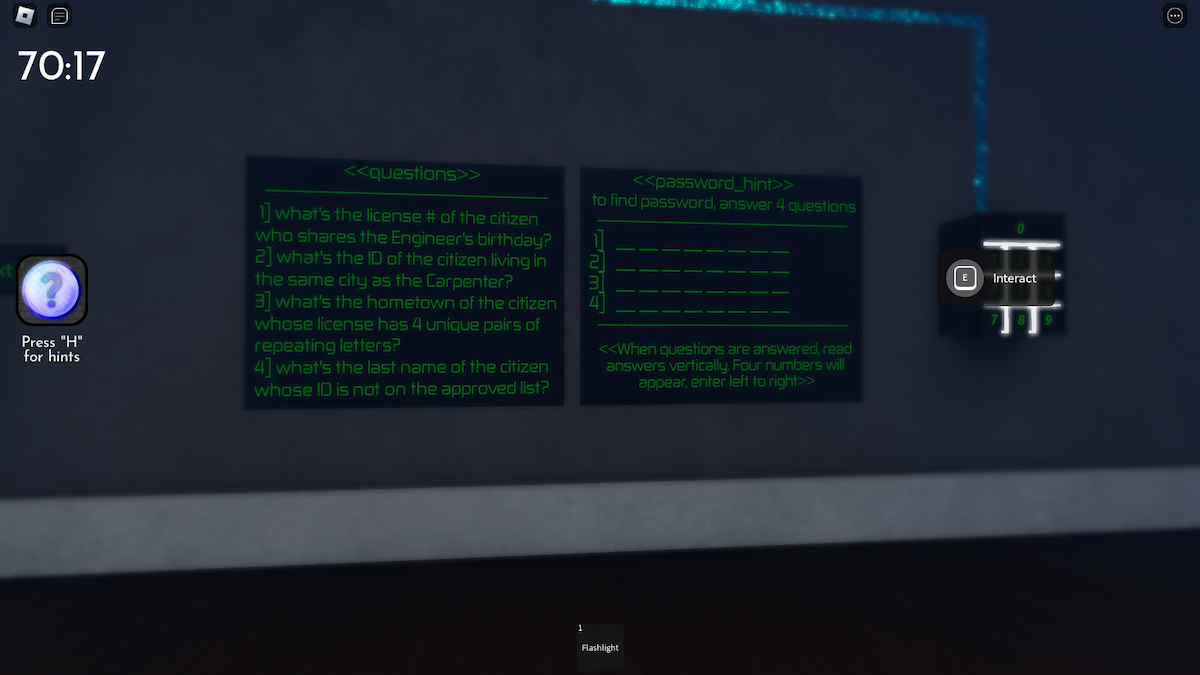
Walk to the center of the room and interact with the illuminated blue platform on the ground, which showcases the ‘Shrink’ interaction. You’ll be transported to another area with a dollhouse, where you must go to the top floor. A series of questions will be presented to you, and you must use the hints in the room to answer them correctly.
Even though this part of the game could be randomized, it seems as if every player gets this set of questions:
- What’s the license number of the citizen who shares the Engineer’s birthday?
- What’s the ID of the citizen living in the same city as the Carpenter?
- What’s the hometown of the citizen whose license has four unique pairs of repeating letters?
- What’s the last name of the citizen whose ID is not on the approved list?
If you compare these questions to the string of letters, the answer should be 5409. Keep in mind that the combination might not be the same. Just follow the hints on the other boards to get the correct answer.
Return to the portal to transport back to the lab, unlocking another blue illuminated spot in the lab room.
Dominos and Simon Says puzzle
You’ll be taken to a location filled with dominos in the second portal. Locate the Simon Says puzzle and memorize the colors it displays. Luckily, this Terminal Escape Room puzzle is relatively easy to complete, as it only features this minigame.
Card puzzle
Just like last time, return to the portal and head to the third one for the following puzzle. Keep track of each player’s hand to calculate everyone’s score. Read the instructions to tally up the points of each hand. It basically works the same as Poker, just with different symbols.
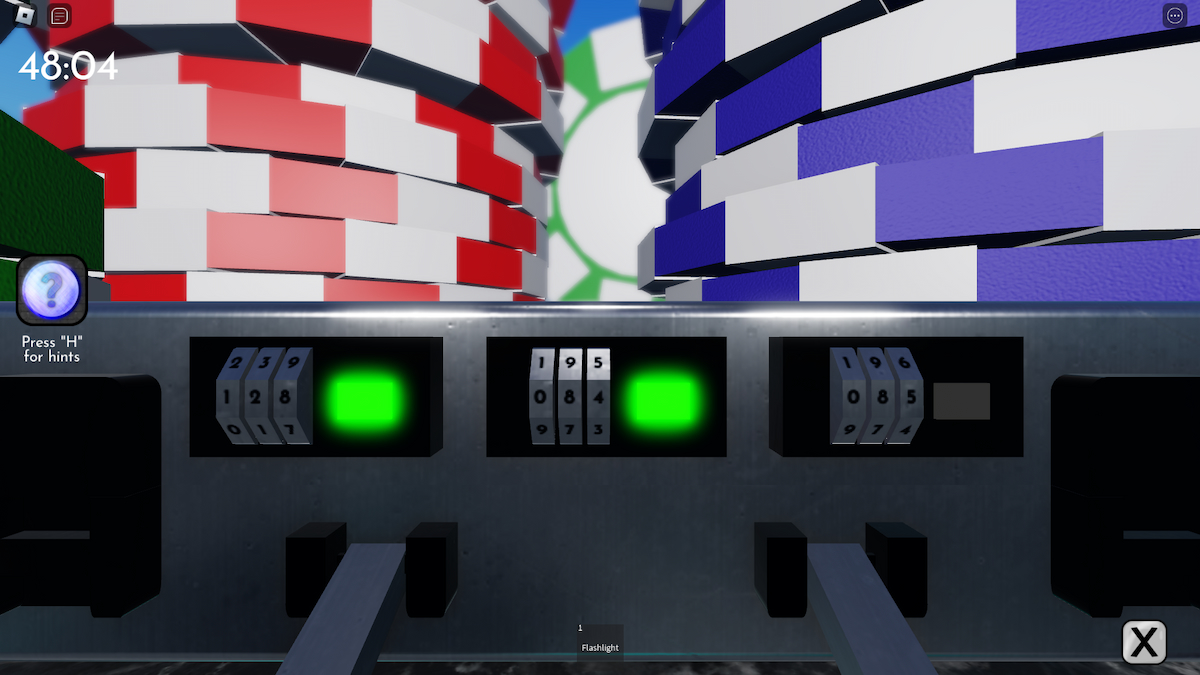
I’ve noticed that the answer to this particular puzzle seems to be the same for everyone. But again, it could be different. The correct passcode for the lock box in the middle should be ‘128’, ‘084’, ‘086’. Once that’s completed, press the button in the case.
Building blocks puzzle

The Terminal Escape Room building blocks puzzle requires you to go to the room at the end of the pathway. Press each blueprint of each house here and note down the three cheapest ones, beginning from lowest to highest. Jot down their corresponding ID number, too, and go outside to see what colored bricks are needed.

The bricks will be red, green, or blue, matching the design of the buttons inside the room. Hit the button and go to the first cheapest house build to see what letter it displays. Make sure to do this in the order it was presented on the building blueprint. Lastly, repeat the same process for the remainder of the puzzle.
After deciphering my puzzle, I got the string ‘Judemgten,’ which I took as the word ‘Judgement’ after scrambling them up. However, you’ll likely have a different set of letters, so just try to follow the steps above to see what word you’ll get.
Pipes puzzle

The last puzzle of Terminal Escape Room Standard Mode takes you back to the lab again. Grab the following items:
- Sledgehammer
- Chain Cutters
- Wrench
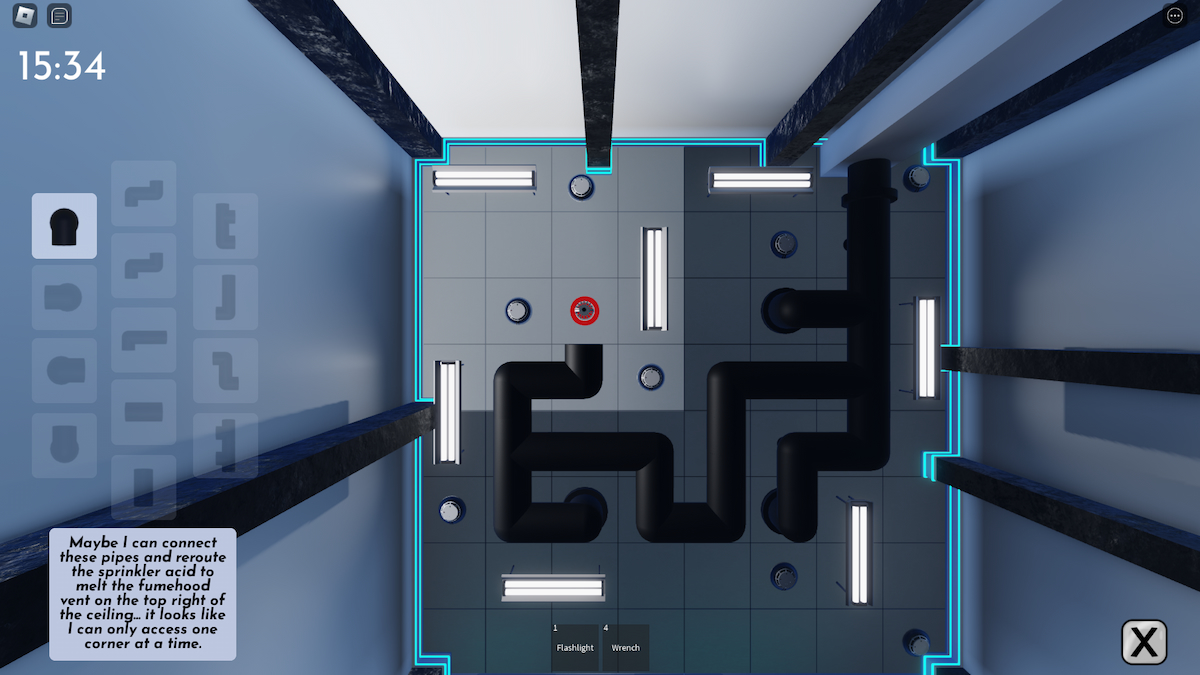
Use the Sledgehammer to break the pipes in the four corners of the room, then utilize the Chain Cutters to cut the chains off the stool. Place the stool on each table and set the pipes in the correct order, covering the red sprinklers. It should look like this toward the end:
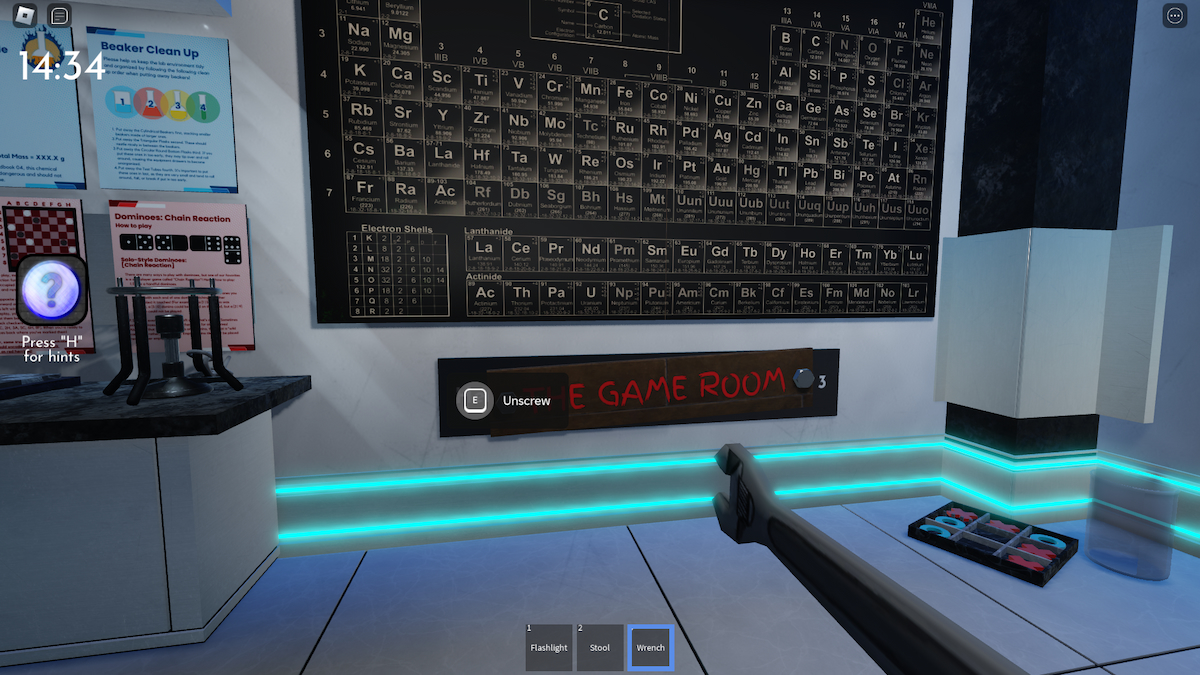
Equip the Wrench to unscrew the ‘The Game Room’ sign and place it down near the wall of posters.
Finally, go to the fume hood and jump inside it to escape the area. You can now pat yourself on the back for completing all four chapters of Terminal Escape Room Standard Mode.


