
Breaking bricks
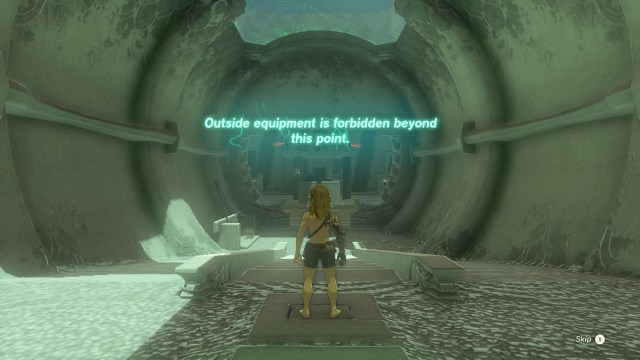
Kimayat Shrine is part of the Proving Grounds family of shrines in Tears of the Kingdom. These shrines all of one thing in common, they take everything off you when you enter. That means, no matter how fancy your armor or how powerful your weapons are, you have to complete them with sheer tenacity. That usually means taking out some contracts along the way too.
But don’t worry about that. We’ll cover everything you need to know to complete Kimayat Shrine below. But first, let’s take a look at where to find it.
How to find Kimayat Shrine in Tears of the Kingdom
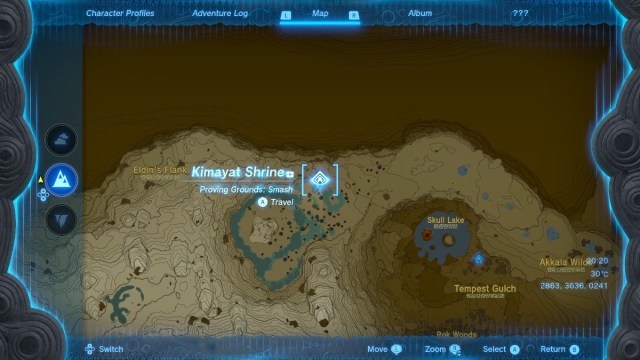
Kimayat Shrine is located in the Eldin Canyon region of Hyrule. The closest fast-travel point for most players will be Ulri Mountain Skyview Tower. Although this tower is still quite a ways from the shrine, if you have unlocked other shrines in the area, such as Kamatukis Shrine, they will be the better fast-travel points to start from.
Kimayat shrine is located at the northernmost point of the map. When starting from Ulri Mountain Tower, head directly north to find the shrine. It will be northwest of Skull Lake. Check the screenshot above for the exact location of Kimayat Shrine on the map.
How to complete Kimayat Shrine
Kimayat Shrine is a combat puzzle shrine that requires you to defeat six constructs using both combat and puzzle mechanics. When you enter the shrine, Link will be stripped of all of his clothes, weapons, and items. This means you need to defeat the constructs in the shrine using only the items you find within.
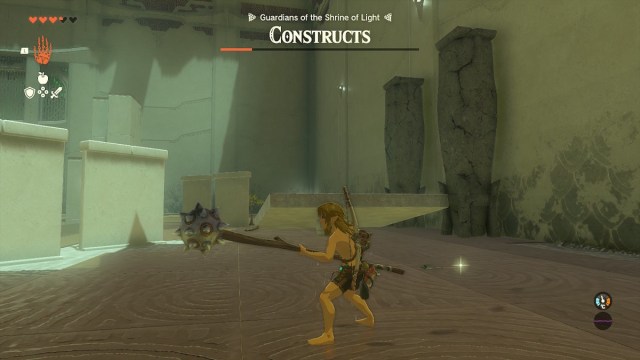
To begin, collect the weapons from the stand at the bottom of the entrance steps. You should find some arrows, a bow, a long stick, and a wooden stick. Do note that you will not be able to defeat all of the constructs using just the weapons here. After collecting your tools, head into the shrine and to the right. There should be a construct immediately here. Kill it quickly so that it cannot raise the alarm.
In the right corner of the shrine near the first construct, there is a Frost Emitter that you can attach to one of your weapons. This will make it significantly easier to defeat the constructs with a melee weapon. Use the Fuse ability to attach the Frost Emitter to your weapon of choice. With your new weapon in hand, kill the remaining two constructs that are on the ground level of the shrine.
The next part is where things get tricky. The final three constructs are on a platform in the center of the water. You don’t have enough arrows to kill all three, and you can’t get to their platform, so you will need to bring them to you. Head to the platform on the lefthand side of the shrine, on the opposite side of the room to where you found the Frost Emitter.
Use Ascend to travel up to the top of the platform. Then, use Fuse to attach one of the spiky metal balls to your other remaining stick. When you have what is essentially a sledgehammer, drop down to the bottom and destroy the two forward-facing breakable pillars.
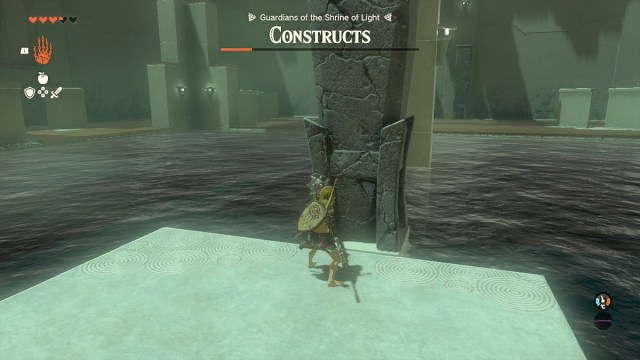
This will allow the platform at the top to fall down to ground level. When it falls down, use Ultrahand to pick it up and carry it across the room to the other still-standing platform. Once again, break the two front pillars so the second platform also falls to the ground. From here, you need to attach the two pieces together to form one long platform. Place the pillars in the water so that Link can reach the breakable pillar holding up the three constructs. Destroy the pillar, and all of the remaining constructs will fall into the water and drown.
Now that all of the constructs are defeated, the shrine exit will open. Before you leave the shrine, make sure to open the chest on the way out. It’s located right by the exit that rewards you with the Light of Blessing. The chest contains an incredibly powerful Captain II Reaper sword that will prove quite useful throughout the game.
That’s it! Kimayat Shrine is complete!


Published: Jun 12, 2023 04:29 am