
While exploring the world in Wuthering Waves, you may find some hidden quests. One such quest, Lost History, requires you to find and repair five lighthouses. The trouble is, none of these lighthouses are marked on the map and you won’t unlock the quest until you find your first lighthouse.
Like I said, you can find these lighthouses in no particular order and the basic premise is always the same: repair the lighthouse, hack the console, then find the nearby treasure. However, the lighthouses themselves are spread wide across the map and each has its own puzzle to solve in order for the repair to happen.
Once you’ve found our first lighthouse and spoken to the Historian in Jizhou, you can find the others in any order you like. You must locate and collect the treasure for each lighthouse before it’s marked off as complete and the quest will allow you to progress.
Lighthouse one: Frosting Harbor

This lighthouse is the first one I found, and in order to repair it you’ll need to use a nearby explosive charge at the thorns which are climbing up the side of it. You can use the Levitator utility to do this, then climb up the side and hack the terminal near the top.
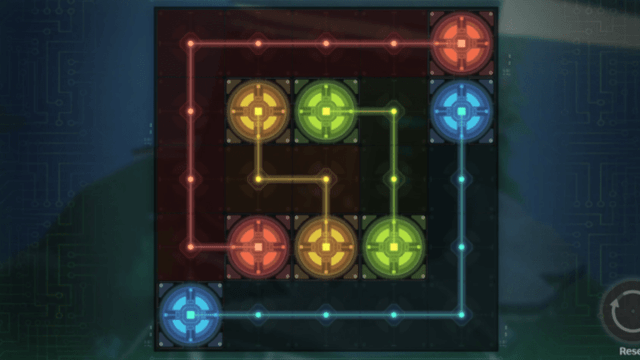
Here’s how the terminal needs to look to successfully hack it:
Once you’ve done this, you’ll receive a riddle. Despite the words of the riddle, you don’t actually have to be at the lighthouse at dawn or change your time. Simply head to the buildings nearby and locate the golden beacon on the ground. Interact with it to spawn a Standard Supply Chest and solve the riddle.
Lighthouse two: Nameless Bay
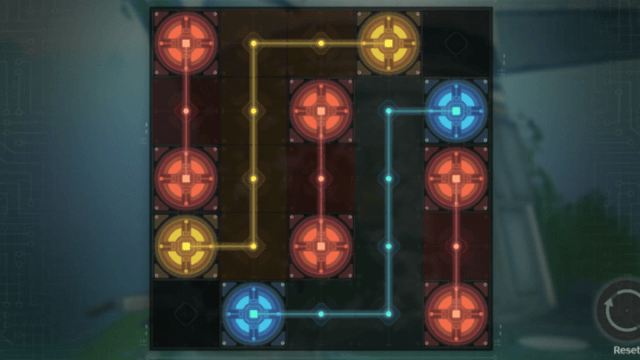
To repair this lighthouse, you’ll need to place a power cell into its corresponding empty socket using the Levitator utility. When you’ve done this, you’ll need to run along the power line, physically hitting all of the small pylons along the way. You have a 42-second time limit for this and, if you aren’t successful the first time, you can repeat the whole process.
Although you shouldn’t need the entire 42 seconds to complete this task, as the pylons are close together and thanks to the blue line in the ground, you know exactly where you need to go next.
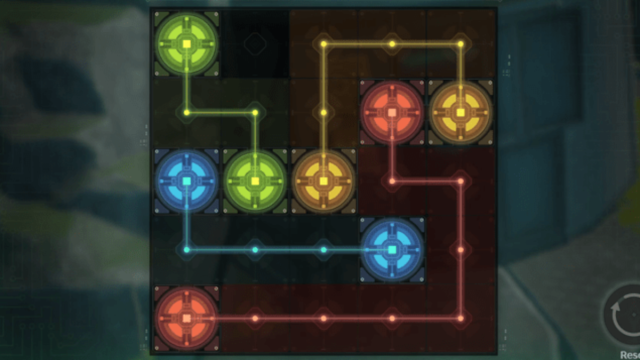
Once you’ve reached the lighthouse, you’ll need to hack it:
Once you’ve completed this, find the treasure by interacting with the golden beacon under a rock nearby, spawning a Standard Supply Chest and completing this lighthouse.
Lighthouse three: Desorock Highland Bay
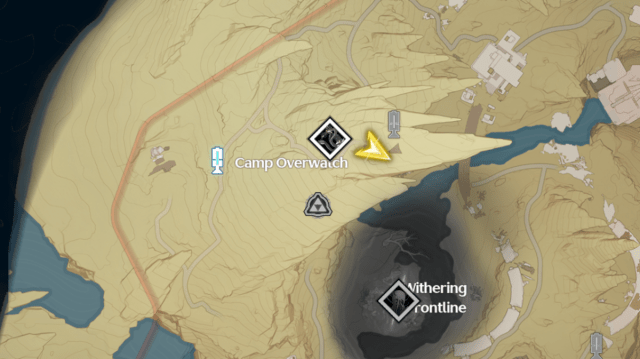
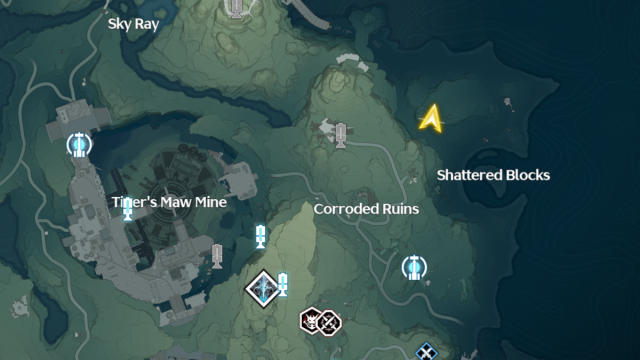
If you have the Resonance Beacon at Camp Overwatch unlocked this lighthouse is really easy to find. Once you’re nearby, you’ll find a Junior Engineer in need of assistance. To repair the lighthouse, you’ll need to accompany her on the journey towards the lighthouse itself, taking out any groups of Tacet Discords that appear.
Once you arrive at the lighthouse, you don’t actually have to do anything aside from climb up to the terminal and hack it:
Once you’ve done this, locate the white glowing beacon just north of the lighthouse and interact with it to spawn a Standard Supply chest.
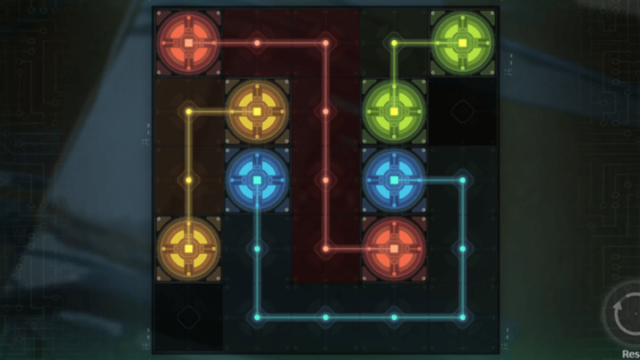
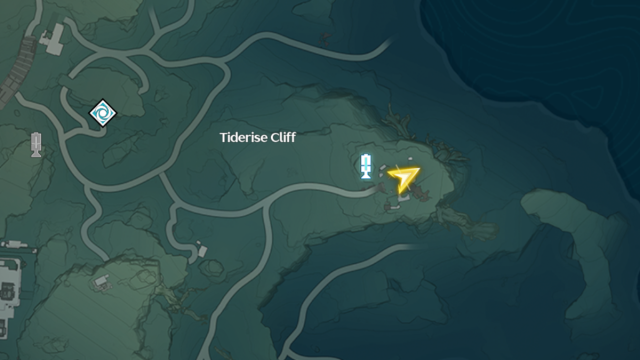
Lighthouse four: Tiderise Cliff
To repair this lighthouse, you’ll simply need to replace two Power Cells into their designated sockets. The first Power Cell is located to the left of the lighthouse in some bushes, the second is located to the right of the lighthouse.
Once you’re replaced the Power Cells, you’re free to climb up the lighthouse and hack the terminal:
To find the treasure for this lighthouse, head north and locate the white beacon. Interact with it to spawn a Standard Supply Chest.
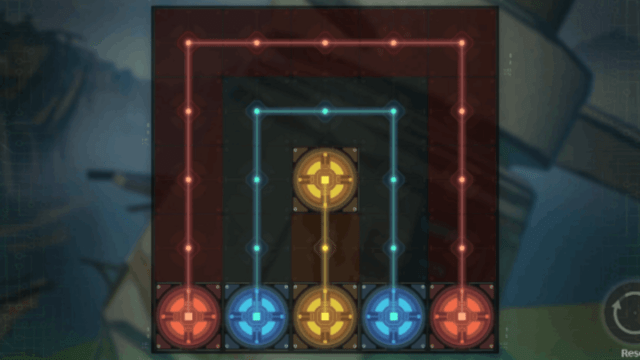
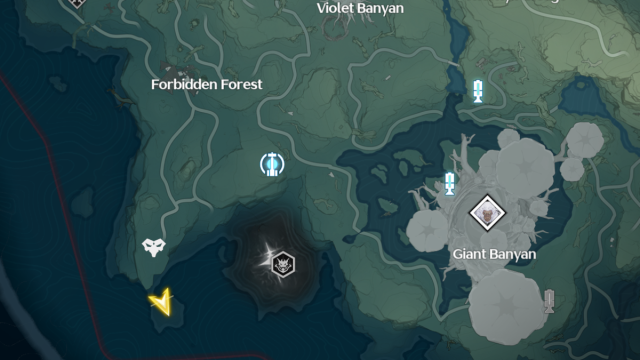
Lighthouse five: Forbidden Forest
Possibly the most difficult lighthouse to gain access to, this one is surrounded by thorns which can only be burned away using a sequence of Explosive Charges approaching the lighthouse.
Use the first Explosive Charge to break through the thorns furthest away from the lighthouse, then use the uncovered second explosive charge to burn through the second set. You can’t go too far with the Charge, so you’ll need to long shot the second set of thorns. Once you’ve burned them down, you’ll find a third Explosive Charge which can be used to burn down the thorns that are attached to the lighthouse itself.
Climb up the lighthouse, and you’ll be able to hack the terminal:
The treasure for this lighthouse is located behind it, closer to the edge of the cliff. Interact with the glowing beacon to spawn a Standard Supply Chest.
Once you’ve repaired all the lighthouses and collected all of the treasure, you can head back to Jinzhou to speak with the Historian again, who will reward you with a Premium Supply Chest. The items within, as well as those rewarded for completing the quest itself, are:
- 40 Astrite
- 50 Union EXP
- 15,000 Shell Credit
- 1 Advanced Resonance Potion
- 1 Basic Resonance Potion
- 2 Medium Resonance Potions
- 2 Medium Energy Cores
- 1 Medium Sealed Tube
- “May the Beacons Guide Us” trophy


Published: May 29, 2024 10:40 am