
In Satisfactory, the Rotor item quickly becomes a staple component used in plenty of recipes, building constructions, and Milestone Upgrades all the way from the early game extending into the end game. Here is the best Rotor Layout in Satisfactory that you can use early on to get your Rotor production up to speed fast.
Best Rotor Layout and Blueprint
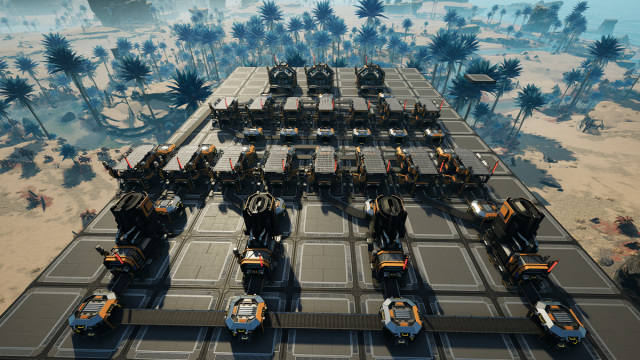
While most of the items and components you will create in the early game of Satisfactory can be quickly set up and even manually crafted, you’re going to want an actual factory to handle the production of your Rotors. The best Rotor layout will produce 10 Rotors per minute for each instance of the factory you build. First, let’s go over everything you will build so you know the upfront material costs required to build this Rotor Layout:
- At least 112.5 incoming Iron Ore per minute
- 4 Smelters producing Iron Ingots
- 8 Constructors producing Iron Rods
- 7 Constructors producing Screws
- 3 Assemblers producing Rotors
- 1 Storage Container for storing Rotors
All of the incoming Iron Ore will feed into the Smelters crafting Iron Ingots, which will all be turned into Iron Rods. From there, the Iron Rods will split, allocating some of them for producing Screws, while sending the rest to the Assemblers at the end of your factory. At the Assemblers, your Screws and Iron Rods are turned into Rotors.
How to build the best Rotor Factory in Satisfactory
Start your Rotor Factory by building a 9-wide and 13-long area of foundations which will be the ground floor for your factory. For the rest of the way, imagine the layout of your factory like a spreadsheet or table when placing each building. Here are all the steps for building this massive Rotor Layout Factory and start producing 10 Rotors per minute:
- Build a 9-wide and 13-long area of foundations which is the ground floor.
- Construct your four Smelters in the second row, in the 2nd, 4th, 6th, and 8th column. Set them to craft Iron Ingots.
- Build your manifold feed line by plating four Conveyor Splitters, one in front of each of the Smelters but in the center of the first row. Each of these should be inputted from the right of your factory, but split to the left and forward.
- Place a Splitter in front of each of the Smelters, centers in row 3, inputting directly from each of the Smelters.
- Build 8 Constructors in Row 4, starting with the first column and going all the way through the 8th column, with the last Constructor in front of your right-most Splitter. Set these all to craft Iron Rods.
- Connect your Splitters with each of your Constructors, with each Splitter feeding two Constructors. Your Conveyor Belts should go from each splitter to the Constructor in front of it, and then out the left side into the Constructor in the column to the left.
- In front of the first three Iron Rod Constructors, build a centered Conveyor Merger in Row 5. Point the output of the Merger in the first column aimed forward, and for the second and third column, aimed to the left. Next, build a Conveyor Splitter in front of the fourth Iron Rod Constructor, inputting from it. Connect the first four Constructors using Conveyor Belts, and then run belts connecting the Splitter and three Mergers, all going to the left feeding into the left most Merger.
- For the last for Iron Rod Constructors, place Conveyor Mergers in Row 5. The Mergers in column 5, 6, and 7 should all be feeding to the right, with the final Conveyor Merger in front of the right most Constructor feeding forward. Connect them all with Conveyor Belts feeding into the right-most Conveyor Merger.
- Go back to the only Conveyor Splitter in Row 5, located in Column 4. Place a Conveyor Belt connecting from the right of this Splitter into the Conveyor Merger on the right in Column 5, and then again from the forward-facing split into the top-most input on the Conveyor Merger in Column 5. Look at the above screenshot for details if this is confusing, to see how Row 5 should be set up.
- Place down 6 Conveyor Splitters in Row 6, in Columns 3, 4, 5, 6, 7, and 8. The Splitter in Column 8 should be fed from the Conveyor Merger in Row 5, while all the others should be feeding to the left. Connect all of these with Conveyor Belts going to the left. As soon as you’re able, upgrade the Conveyor Belt connecting the Merger in Row 5 to the Splitter in Row 6 to Tier 2.
- Construct 7 new Constructors in Row 7, starting in Column 2 and going through Column 8. All of these should be set to create Screws. If you have Underclocking unlocked, set the right-most Constructor to 25% Clock Speed producing only 10 per minute to help with bottlenecking. Connect all the splitters in Row 6 to the Constructors in Row 7.
- In Row 8, Column 3, place a Conveyor Merger feeding forward, then connect the first two Screw Constructors to it. In Column 4, place a Splitter feeding in from the Screw Constructor in front of it, and then another forward-facing Constructer Merger in Column 5. Connect the Constructers to the Merger/Splitter in front of it, as well as connect belts between each output side of the Splitter into the Merger beside it. Connect the third Screw Constructor from the right into the Merger to the left of it as well. Finally, in Column 7, put a forward-facing Conveyor Merger, then connect the two right-most Constructors to it.
- It’s finally time to put down our Rotor Assemblers. Put all of these in the Row 10 region. Place the first one so that the leftmost input is lined up with the left-most Merger in Row 8. To the right of that, put down an Assembler where the right-most input lines up with the Merger in Row 8 that is to the right of the Splitter. Place the third and final Assembler so that the rightmost input lines up with the right-most Merger in Row 8. Connect them all with conveyor belts.
- Place a Conveyor Splitter on top of each of the three Conveyor Mergers in Row 8, feeding from the left. Connect the forward facing output of each of these splitters to the left-input of each of the three Assemblers in front of them. Connect the Splitters with belts, and then connect the left-most Merger from Row 5, feeding into the left-most splitter you just created in Row 8.
- Make sure all the Assemblers are set to make Rotors, and as soon as you unlock Underclocking, set the right-most Assembler to 50% which will produce 2 Rotors per minute.
- Place a right-facing Conveyor Merger after the second and third Assemblers, then run a Conveyor Belt from the first Assembler into the left of the first Merger, then a belt connecting the first Merger to the second one to the right of it.
- Finally, to the right of the Merger, place a Storage Container and connect it with a belt, so all of your Rotors will be sent into that Storage Container.
All that’s left to do is power your factory then feed the Iron Ore into it, and voila, with this best Rotor layout in Satisfactory, you’ll be producing 10 Rotors per minute, fully automated!


Published: Sep 12, 2024 05:26 pm