
There are a plethora of Stratagems for players to use to devastating effect in Helldivers 2. While heavy weapons and resupply drops are useful, sometimes the best tool for the job is a slew of shells from the Orbital 380MM HE Barrage on your Superdestroyer.
You’ll unlock new Stratagems over time in Helldivers 2 as you play more missions and earn rewards from, hopefully, successful objective completions and extractions. While your basic weapons are fine and will net you a tonne of kills and help you support your team, sometimes you need something bigger to throw into the mix, like the Orbital 380MM HE Barrage or a Thermite Grenade. But none of these weapons are useful if you don’t know what to do with them.
How to get the Orbital 380MM HE Barrage in Helldivers 2
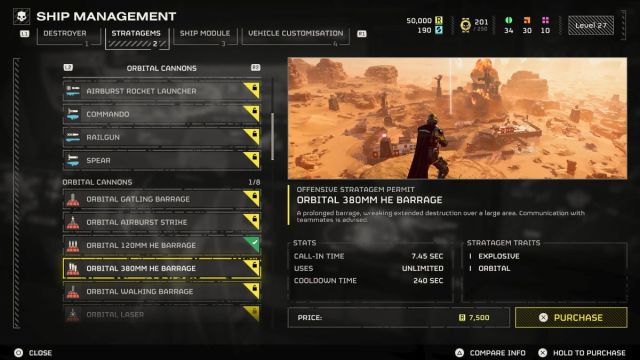
To get the Orbital 380MM HE Barrage in Helldivers 2, you need to buy it from the Stratagems tab in your Superdestroyer’s Ship Management menu. It costs 7,500 Requisition Slips, but that’s not too much considering how much you usually earn while tackling missions for a Major Order. Following the game’s 60-day update, the gameplay is in a much better place, so you should really be struggling with too many Requisition Slips, if anything.
How to use the Orbital 380MM HE Barrage to maximize kills in Helldivers 2
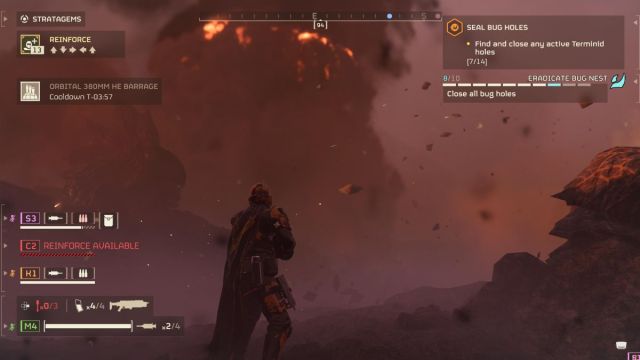
The key to using the Orbital 380MM HE Barrage to maximize kills in Helldivers 2 is waiting for the perfect time to use it. Once triggered, the Stratagem will cause your Superdestroyer to slowly fire massive shells down in the general vicinity you’ve marked with your targeting beacon.
The shots from the Orbital 380MM HE Barrage are devastating. They’ll cripply Bile Titans and cause havoc for Automaton armies, but if you use them on a single foe, you’re not going to rack up that many kills for a Personal Order or your squad.
I find that waiting until a huge horde of enemies is chasing you is the best time to use the Orbital 380MM HE Barrage. Chuck it down in front of you and then run over to it. By the time you reach it, the shells should be raining down, and they’ll cause all sorts of trouble for whatever is pursuing you.
Another great time to use the Orbital 380MM HE Barrage is when you find a bug nest or an Automaton factory. Anywhere, there are lots of enemies clustered together, and more emerging all the time, which is great for racking up the kills. You’ll also inadvertently close Bug Holes and destroy Fabriators, which are bonuses when you’re not overwhelmed and ripped to shreds by the enemies of Super Earth.
Best loadout for Orbital 380MM HE Barrage in Helldivers 2
The best loadout for you in Helldivers 2 is one you’re comfortable with and know well. Stick to the Stratgems you trust and have the timings down to muscle memory for, and you’ll be able to complete any Major Order thrown at you.
That said, it can be difficult to determine which Stratagems best complement the Orbital 380MM HE Barrage in Helldivers 2. I’ve put together a good base for you to use below, but feel free to add in what works for you as you go.
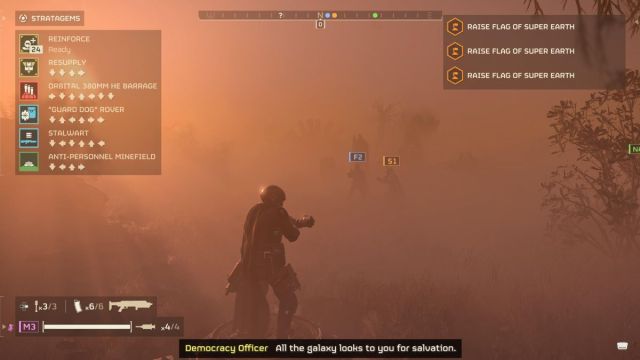
- Orbital 380MM HE Barrage
- Stalwart
- Anti-Personnel Minefield
- Guard Dog Rover
The idea here is that you call down the Stalwart and Guard Dog Rover at the start of a mission or right after emerging from your Hellpod. The Stalwart is a solid heavy weapon with which to clean up enemies, and the Guard Dog Rover will have your back when there are loads of them around.
As I mentioned above, you need to use the Orbital 380MM HE Barrage around huge groups of enemies for maximum kills. This can be problematic if those enemies spot you and aren’t caught in a shell blast. Use the Anti-Personnel Minefield to create a barrier so whatever isn’t killed by all your other weapons will explode as it tries to chase you down.
As for primary, secondary, and throwable weapons, go with what you can use well. These change for every player, and they really don’t add much into the equation when looking at your Stratagem loadout, so just use whatever feels comfortable and gets you loads of kills.


Published: Sep 18, 2024 06:02 am