
Bare Minimum
Mayachideg Shrine is one of the more difficult shrines in the Tears of the Kingdom Proving Grounds series. If you haven’t already come across one, the Proving Grounds shrines are all combat challenges where Link loses all of his weapons and items at the entrance. They have to be completed using ingenuity and skill.
Mayachideg is no different, but the constructs here deal a lot of damage, and it’s easy to become overwhelmed. We’ll cover everything you need to know to defeat them below, but first, let’s take a look at how to find Mayachideg Shrine.
How to find Mayachideg Shrine in Tears of the Kingdom
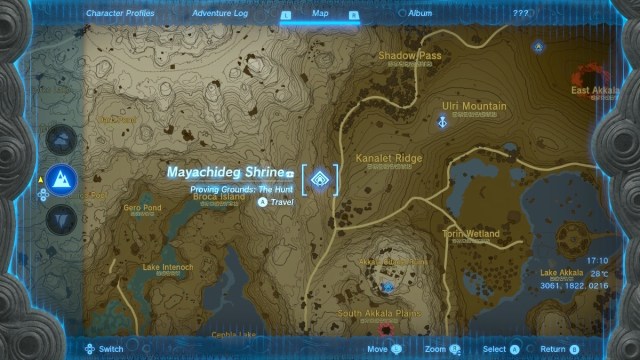
Mayachideg Shrine is in the Eldin Canyon region of Hyrule. The closest fast travel point for most players will be Ulri Mountain Skyview Tower. When you arrive at the tower, use it to glide southwest past Kanalet Ridge to reach the shrine at the foot of the mountain. Check the screenshot above for the exact location on the map.
How to complete Mayachideg Shrine
When you enter Mayachideg Shrine, all of your weapons, armor, and items will be taken from you. To start, take the wooden stick from the stand to the left of the entrance.
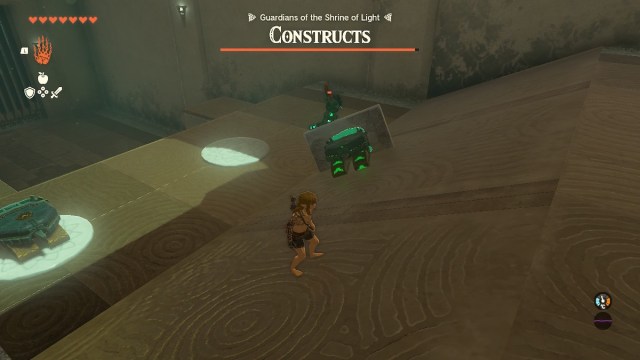
In the first room is a construct that needs to be killed to unlock the next area. Take one of the spiked plates from the platforms in this room and attach it to one of the two green Roomba-like machines. Hit the Roomba, and it will head down the slope and towards the construct. Each time the Roomba hits the construct, it will take damage.
The Roomba will automatically drive towards the construct, hitting it with the spiked plate until it is dead. Since you only have a wooden stick, it’s wise to let the Roomba do its work and avoid the construct completely.
Only one Roomba is needed to defeat the construct, but you can build both as they will be needed later. You may need to use Ultrahand to pick up and maneuver the Roombas on occasion. They are prone to tipping or getting stuck.

When the construct is dead and the door opens, you will be faced with a room that contains a whole group of constructs that hit incredibly high. Take the wooden bow, arrows, and thick stick before heading into the next room
The constructs in this room will deal at least 3.5 hearts of damage for a single hit. Therefore, if you have seven or fewer hearts, you can only afford two hits before dying. It’s best to keep moving so you can avoid taking hits from the constructs and build more Roomba tanks. It’s possible to kill every construct in this room without dealing a single blow yourself.
On the right side of the room, there’s a singular platform that holds a Roomba and the parts to build a particularly strong weapon. Glide over to this platform, attach the plate to the front of the Roomba (similar to the spiked plates from earlier), and connect both of the small emitters to the plate, one on each side. One will emit electricity, and the other will freeze. See the picture above for how the Roomba should look.
You’ll need to use Ultrahand to take it off the platform so that it can go on its rampage. Hit it with your stick to activate it before using Ultrahand to put it in the position to send it on its way.
Once you have this third Roomba active, it’s all about maintaining your devices and avoiding the constructs. There are some spiky balls that you can attach to one of your sticks to take on a rogue construct yourself. However, this isn’t recommended unless you have enough hearts to take a number of hits from them.
The Roombas will occasionally get knocked over, stuck, or stop. You need to make sure they stay active long enough to kill the constructs. As your Roombas are killing the constructs, the group may be distracted enough to let you build more Roombas to attack.
More Roombas can be found in the center of the room and on the platform to the left. Try to build these if/when you get an opening where the constructs are too busy fighting with your current Roombas to attack you. Don’t take any risks trying to build a Roomba if there’s a construct nearby since their hits are so deadly.
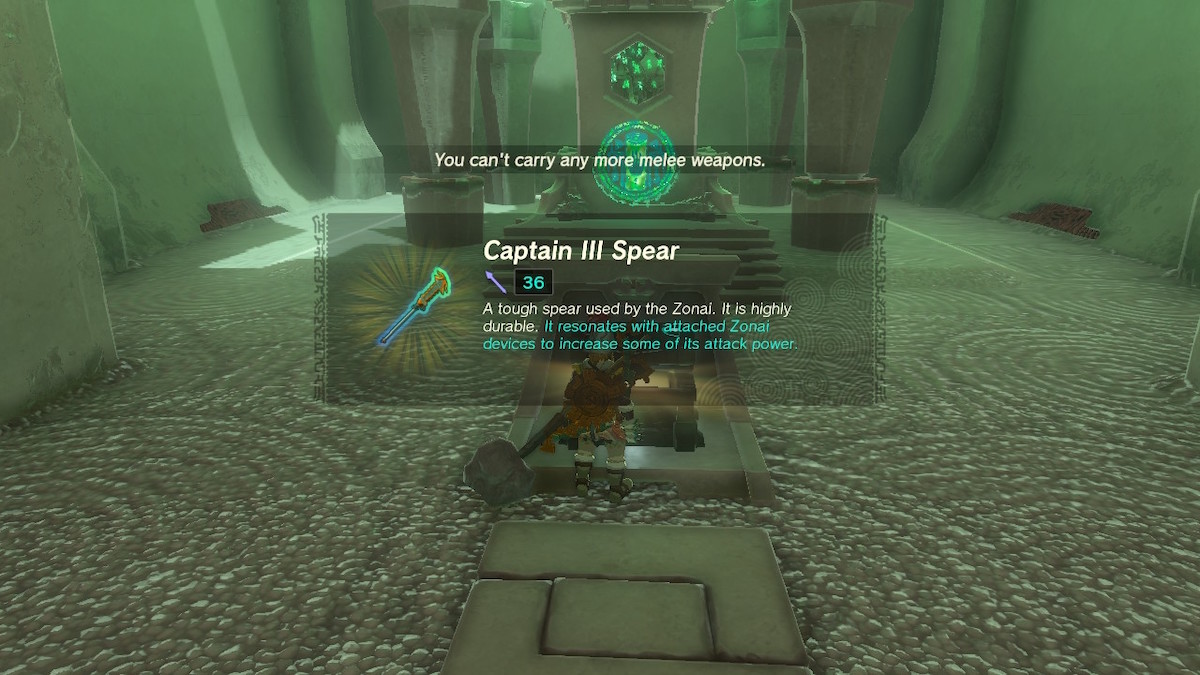
Once all of the constructs are defeated, the exit to the shrine will open. Before you leave, make sure to open the chest near the exit to receive a powerful Captain III Spear.


Published: Jun 19, 2023 04:26 am